Controlling the Android Emulator and Virtual Devices (AVDs) via the command-line

I Googled all around to try and figure out how to tweak Android Emulator virtual devices (AVDs) via the command-line.  The Android Emulator documentation online has some options for running the emulator, but it didn’t allow me to specify memory at runtime, and many other things I wanted to customize.  There is also documentation specific to the creation of AVDs (vs just the running of them on the emulator), but that kept referring to the UI tools for it. I’ve gotten so used to Googling for help, that I didn’t think of running help locally :-p

emulator -help

That gives us a LOT of options that are not documented on the website including.

Android Emulator usage: emulator [options] [-qemu args]
  options:
    -list-avds                     list available AVDs
    -sysdir <dir>                  search for system disk images in <dir>
    -system <file>                 read initial system image from <file>
    -writable-system               make system image writable after 'adb remount'
    -datadir <dir>                 write user data into <dir>
    -kernel <file>                 use specific emulated kernel
    -ramdisk <file>                ramdisk image (default <system>/ramdisk.img
    -image <file>                  obsolete, use -system <file> instead
    -initdata <file>               same as '-init-data <file>'
    -data <file>                   data image (default <datadir>/userdata-qemu.img
    -partition-size <size>         system/data partition size in MBs
    -cache <file>                  cache partition image (default is temporary file)
    -cache-size <size>             cache partition size in MBs
    -no-cache                      disable the cache partition
    -nocache                       same as -no-cache
    -sdcard <file>                 SD card image (default <system>/sdcard.img
    -snapstorage <file>            file that contains all state snapshots (default <datadir>/snapshots.img)
    -no-snapstorage                do not mount a snapshot storage file (this disables all snapshot functionality)
    -snapshot <name>               name of snapshot within storage file for auto-start and auto-save (default 'default-boot')
    -no-snapshot                   perform a full boot and do not do not auto-save, but qemu vmload and vmsave operate on snapstorage
    -no-snapshot-save              do not auto-save to snapshot on exit: abandon changed state
    -no-snapshot-load              do not auto-start from snapshot: perform a full boot
    -snapshot-list                 show a list of available snapshots
    -no-snapshot-update-time       do not do try to correct snapshot time on restore
    -wipe-data                     reset the user data image (copy it from initdata)
    -avd <name>                    use a specific android virtual device
    -skindir <dir>                 search skins in <dir> (default <system>/skins)
    -skin <name>                   select a given skin
    -no-skin                       don't use any emulator skin
    -noskin                        same as -no-skin
    -dynamic-skin                  dynamically construct a skin of given size, requires -skin WxH option
    -memory <size>                 physical RAM size in MBs
    -accel <mode>                  Configure emulation acceleration
    -no-accel                      Same as '-accel off'
    -ranchu                        Use new emulator backend instead of the classic one
    -engine <engine>               Select engine. auto|classic|qemu2
    -netspeed <speed>              maximum network download/upload speeds
    -netdelay <delay>              network latency emulation
    -netfast                       disable network shaping
    -code-profile <name>           enable code profiling
    -show-kernel                   display kernel messages
    -shell                         enable root shell on current terminal
    -no-jni                        disable JNI checks in the Dalvik runtime
    -nojni                         same as -no-jni
    -logcat <tags>                 enable logcat output with given tags
    -no-audio                      disable audio support
    -noaudio                       same as -no-audio
    -audio <backend>               use specific audio backend
    -raw-keys                      disable Unicode keyboard reverse-mapping
    -radio <device>                redirect radio modem interface to character device
    -port <port>                   TCP port that will be used for the console
    -ports <consoleport>,<adbport> TCP ports used for the console and adb bridge
    -onion <image>                 use overlay PNG image over screen
    -onion-alpha <%age>            specify onion-skin translucency
    -onion-rotation 0|1|2|3        specify onion-skin rotation
    -dpi-device <dpi>              specify device's resolution in dpi (default 165)
    -scale <scale>                 scale emulator window (deprecated)
    -http-proxy <proxy>            make TCP connections through a HTTP/HTTPS proxy
    -timezone <timezone>           use this timezone instead of the host's default
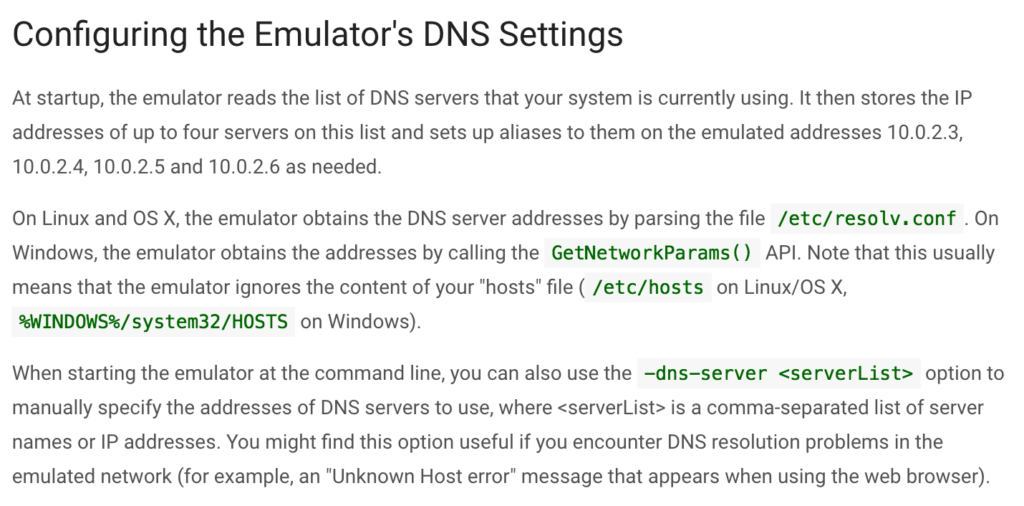
    -dns-server <servers>          use this DNS server(s) in the emulated system
    -cpu-delay <cpudelay>          throttle CPU emulation
    -no-boot-anim                  disable animation for faster boot
    -no-window                     disable graphical window display
    -version                       display emulator version number
    -report-console <socket>       report console port to remote socket
    -gps <device>                  redirect NMEA GPS to character device
    -keyset <name>                 specify keyset file name
    -shell-serial <device>         specific character device for root shell
    -tcpdump <file>                capture network packets to file
    -bootchart <timeout>           enable bootcharting
    -charmap <file>                use specific key character map
    -prop <name>=<value>           set system property on boot
    -shared-net-id <number>        join the shared network, using IP address 10.1.2.<number>
    -nand-limits <nlimits>         enforce NAND/Flash read/write thresholds
    -gpu <mode>                    set hardware OpenGLES emulation mode
    -camera-back <mode>            set emulation mode for a camera facing back
    -camera-front <mode>           set emulation mode for a camera facing front
    -webcam-list                   lists web cameras available for emulation
    -screen <mode>                 set emulated screen mode
    -force-32bit                   always use 32-bit emulator
    -selinux <disabled|permissive> Set SELinux to either disabled or permissive mode

     -qemu args...                 pass arguments to qemu
     -qemu -h                      display qemu help

     -verbose                      same as '-debug-init'
     -debug <tags>                 enable/disable debug messages
     -debug-<tag>                  enable specific debug messages
     -debug-no-<tag>               disable specific debug messages

     -help                         print this help
     -help-<option>                print option-specific help

     -help-disk-images             about disk images
     -help-keys                    supported key bindings
     -help-debug-tags              debug tags for -debug <tags>
     -help-char-devices            character <device> specification
     -help-environment             environment variables
     -help-keyset-file             key bindings configuration file
     -help-virtual-device          virtual device management
     -help-sdk-images              about disk images when using the SDK
     -help-build-images            about disk images when building Android
     -help-all                     prints all help content

I hope you found this from YOUR Google search about this, and it helped 🙂

Running Multiple Android Emulators Simultaneously on OSX

I had a long standing issue where I could only launch two emulators on my Macbook Pro simultaneously.  Any other emulators would launch and get a black screen and wouldn’t load.  I accepted this as fact, and carried on with life.

screen-shot-2016-09-07-at-7-11-45-pm

Finally today I found the need to figure out “why” this was the case as I wanted to start sharding my Android UI tests to speed them up.  I was given the suggestion that it could be the # of CPUs or the amount of RAM.  If you look in the logs you may see something like this (if you launch the emulator from android avd):

screen-shot-2016-09-07-at-7-15-46-pm

or you may see:

“HAXM does not have enough memory remaining to load this AVD.”

In order to change your memory allocation for HAXM, you need to re-install it, so run the installer again which is a DMG at: [$ANDROID_HOME/sdk/extras/intel/Hardware_Accelerated_Execution_Manager/ ] and this time select more memory. [HAXM Technical Docs]screen-shot-2016-09-07-at-8-27-05-pm

But… before you install, make sure you have the latest version. The latest version as of September 7th, 2016 is 6.0.3 (Which was released on June 21, 2016).
screen-shot-2016-09-07-at-7-33-01-pm

On my Macbook, I was given 2048MB of memory by default which allowed me to run 2 emulators simultaneously (as seen above).screen-shot-2016-09-07-at-6-58-46-pm

I have 16GB total memory though, so lets make it so I can run a bunch of emulators at once by allocating 8GB 🙂
8192
confirm

Here is my Macbook Pro running 6 Android emulators simultaneously after the changes:
screen-shot-2016-09-07-at-8-17-17-pm

Success!!!  May the sharding begin!

Related Links:

DNS on the Android Emulator

The last few days I have been struggling to get the Android Emulator to connect to certain domains through a proxy we have at my job.  Because of this, I started messing with my OS X DNS configuration and got myself in a DNS mess.  I finally figured my way out, so I wanted to share with you how DNS works with the Android Emulator, and hopefully avoid the troubles I ran into.

Android Documentation:

Screen Shot 2016-05-03 at 7.44.53 PM
http://developer.android.com/tools/help/emulator.html#dns

The Android Emulator uses the DNS settings of your OS X machine from/etc/resolv.conf as mentioned above.  The file looks something like:

#
# Mac OS X Notice
#
# This file is not used by the host name and address resolution
# or the DNS query routing mechanisms used by most processes on
# this Mac OS X system.
#
# This file is automatically generated.
#
search fios-router.home
nameserver 192.168.1.1

This file is re-generated by OS X as you connect to different networks (different WiFi hotspots or ethernet connections) to properly resolve DNS entries while connected to that network.

The thing I didn’t know is that /etc/resolv.conf is by default a symbolic link to /var/run/resolv.conf.  So, if you ever mess with /etc/resolv.conf and want to put back the original, you’ll have to re-create the symbolic link on your system, so that your global overrides are no longer in place.  Create the symbolic link using the following command:

sudo ln -s /var/run/resolv.conf /etc/resolv.conf

Anyways, you can override your DNS entries for the Android Emulator via the command line using the “-dns-server” option, or you can edit /etc/resolv.conf and override it globally.  Just realize that you need to create a symbolic link to /var/run/resolv.conf in order to “revert” changes if you mess with /etc/resolv.conf.

Happy DNS’ing with the Android Emulator and I hope for your case you don’t ever have to deal with it!

Using the Android Emulator for Continuous Integration

Screen Shot 2016-04-23 at 9.06.54 PM

I spent the last few weeks figuring out how to get our Android Tests running on our Jenkins CI (Continuous Integration) server using the latest Android Emulator. I am sharing what I learned so that I can hopefully help someone else and so I can refer back to it in the future.

Result of this tutorial/example:

You will be able to programmatically create an Android Emulator AVD (Android Virtual Device), start it, wait for it to load, run your tests, then kill the emulator, generate a Spoon html test report.

Screen Shot 2016-04-23 at 8.55.17 PM

Assumptions for this example:

  • You have the Android SDK configured on this machine with:
    • SDK components for API 23
    • The latest build tools
    • Google apis support
    • API 23, x86_64 with Google APIs Image
    • HAXM support installed
  • You have an Android build flavor named “qa”.
  • You are running your tests on a “debug” build.
  • You have built the APK and test APK with:
    • ./gradlew clean app:assembleQaDebug and app:assembleQaDebugAndroidTest
  • You have Android tests in a Java package called “integration_tests”
  • spoon-runner-1.2.0-jar-with-dependencies.jar exists in your working directory.
  • You want to use an API 23, x86_64, Google APIs enabled AVD (Note, you could easily change these, but this is what this example uses)

To download all the necessary SDK components referenced above, you can run the following command, or just download the components using the UI version of the Android SDK Manager.  NOTE: These commands aren’t scripted for a CI server.  You have to manually accept licensing terms:

android update sdk --no-ui --all --filter 'platform-tools,extra-android-support,build-tools-21.1.1,extra-android-m2repository,extra-google-m2repository,android-23,addon-google_apis-google-23,sys-img-x86_64-google_apis-23'

This Android test execution script will:

  • Forcefully create an AVD for this test (so that it is a fresh device every time)
  • Use port 6000 for the emulator (This is arbitrary, but by default, it is 5554 and assigned by Android).
  • Start the emulator for the AVD on a specific port (so we can target the device by serial with “emulator-{PORT}”
  • Ensure the emulator started by polling for the emulator to be booted
  • Use Spoon to run the tests in a specific package
  • Kill this emulator instance after our tests complete
#CONFIG
FLAVOR="qa"
PACKAGE_NAME="com.example.myapp"
AVD_NAME="integration-tests"
PORT=6000

##############################################################################

#Ensure the Test APK is built already.
TEST_APK_FILE="app/build/outputs/apk/app-${FLAVOR}-debug-androidTest-unaligned.apk"
if [ ! -f "${TEST_APK_FILE}" ]
then
	echo "androidTest APK doesn't exist, exiting.  Make sure you run ./gradlew app:assembleQaDebug app:assembleQaDebugAndroidTest"
exit
else
	echo "androidTest APK Exists, continuing"
fi

#Calculate the Serial Number of the emulator instance
SERIAL=emulator-${PORT}

echo "Creating (forceful) AVD with name ${AVD_NAME}"
# We have to echo "no" because it will ask us if we want to use a custom hardware profile, and we don't.
echo "no" | android create avd \
    --name "${AVD_NAME}" \
    --target "android-23" \
    --abi "google_apis/x86_64" \
    --skin "WXGA720" \
	--force
echo "AVD ${AVD_NAME} created."

#Start the Android Emulator
#"2>&1" combines stderr and stdout into the stdout stream
START_EMULATOR="emulator \
	-avd ${AVD_NAME} \
	-netspeed full \
	-gpu on \
	-netdelay none \
	-port ${PORT}"

echo $START_EMULATOR
$START_EMULATOR 2>&1 &

#Ensure Android Emulator has booted successfully before continuing
EMU_BOOTED='unknown'
while [[ ${EMU_BOOTED} != *"stopped"* ]]; do
    sleep 5
    EMU_BOOTED=`adb -s ${SERIAL} shell getprop init.svc.bootanim || echo unknown`
done

duration=$(( SECONDS - start ))
echo "Android Emulator started after $duration seconds."

# Get the file name of the QA APK (we need to cope with the version number changing)
APK_LIST_AS_TEXT="$(ls -t app/build/outputs/apk/*-android-debug-*-${FLAVOR}.apk)"
APK_FILES=( $APK_LIST_AS_TEXT )

# Use the Spoon utility as a test runner
SPOON_COMMAND="java -jar spoon-runner-1.2.0-jar-with-dependencies.jar \
	-serial ${SERIAL} \
	--apk ${APK_FILES[0]} \
	--test-apk ${TEST_APK_FILE} \
	--no-animations \
	--fail-on-failure \
	--debug
echo "Running: ${SPOON_COMMAND}"
${SPOON_COMMAND}

#Stop the Android Emulator
echo "Killing the Android Emulator with serial: ${SERIAL}"
adb -s ${SERIAL} emu kill

Final notes & tips:

  • Because the Android Emulator’s serial number is in the format of “emulator-{SERIAL}”, it is very important to start the emulator on a specific port (using the “-port {PORT}” param) so that you can reference the image by serial number.  This allows you to launch more than one emulator on the same build machine.
  • Command to list available Android platforms
    android list targets
  • Command to list available AVDs
    android list avd
  • Command to list all available SDK components that you can –filter for in the “update sdk” command:
    android list sdk --all --extended

If you have any questions or comments, let me know on Twitter at @HandstandSam.