[Experiment] Espresso Closed-Box Testing

I wanted to write some Android Espresso tests for a large application, but iterate on the tests as fast as possible.

Typically someone would run :app:connectedDebugAndroidTest to run their instrumentation tests, but under the hood that is just compiling and installing both the app and androidTest apks, and using the instrumentation runner over adb.

When executing Android Instrumentation Tests, you just need an app.apk and an androidTest.apk, and then to invoke the test instrumentation runner via adb.

Because of the configuration, the androidTest APK gets everything that is on the app‘s classpath so it can reference resources, classes and activities in the app.

The Experiment

I wanted to see if I could build an androidTest.apk without having any ties to the original :app. I tried a few methods, but found that creating a new blank application with the exact same package name, and then writing tests under the androidTest folder allowed me to compile quickly.

Problems:

  1. No access to the classpath & resource identifiers
  2. Classpaths can’t clash (must use same versions of dependencies as the original app).

Workarounds:

  1. You could import just a few modules that have resource identifiers or code that you want to reference in your tests. (easier and typesafe, but a little slower)
  2. OR you could just access everything by fully qualified package names, and look up resource identifiers by ID. (no compile time safety, but faster)

I tried workaround #2, because I wanted to have this be the fastest iteration time possible, and I finally got it to work! Here’s my receipt for how I made it happen.

How I Got it Working

1) Install my app (com.example.app) as usual :app:installDebug.

This will be the app I want to test.

2) Create the :cloneapp project

In this :cloneapp project, keep an empty main source folder, but add an androidTest directory.

3) In :cloneapp set the package name to the the exact same package name com.example.app.

android {
    defaultConfig {
        applicationId "com.example.app"
    }
}

4) In :cloneapp update the src/androidTest/AndroidManfest.xml

<manifest xmlns:android="http://schemas.android.com/apk/res/android"
      xmlns:tools="http://schemas.android.com/tools">
    <instrumentation
        android:name="androidx.test.runner.AndroidJUnitRunner"
        android:targetPackage="com.example.app"
        android:targetProcesses="com.example.app" />
</manifest>

5) Add in a test!

package com.example.app.tests

import android.app.Activity
import android.content.Context
import android.os.SystemClock
import android.util.Log
import androidx.test.core.app.ApplicationProvider
import androidx.test.espresso.Espresso
import androidx.test.espresso.ViewInteraction
import androidx.test.espresso.action.ViewActions
import androidx.test.espresso.assertion.ViewAssertions
import androidx.test.espresso.matcher.ViewMatchers
import androidx.compose.ui.test.junit4.createComposeRule
import org.junit.Before
import org.junit.Rule
import org.junit.Test

fun findResourceIntByIdStr(id: String): Int {
    ApplicationProvider.getApplicationContext().resources.getIdentifier(id, "id", applicationContext.packageName)
    Espresso.onView(ViewMatchers.withId(findResourceIntByIdStr(idStr)))
}

fun findViewByIdStr(idStr: String): ViewInteraction {
    Log.d(TAG, "Find View By ID Str $idStr")
    return 
}

class ExampleTest {

    /** Use this to interact with Compose surfaces */
    @get:Rule
    val composeTestRule = createComposeRule()

    @Test
    fun testLoginFlow() {
        
    }
}

6) Install the test clone APK

Run :cloneapp:installDebugAndroidTest to install the test apk.

7) Run the tests using adb!

adb shell am instrument -w -r com.example.app.test/androidx.test.runner.AndroidJUnitRunner

Note: You can be more explicit with command line instrumentation arguments about what test or test class you want to execute.

8) Test Development Iteration Loop

I ended up clearing the app data between runs with adb shell pm clear com.example.app as well so I had consistent behavior and didn’t have to install the package.

Conclusion

As mentioned, this was an experiment. It made the iteration time blazing fast, but lacked compile time safety. Anyways, it’s possible, and hopefully you learned something. If you end up using this technique, I’m curious to hear more. Feel free to message me on Kotlin Lang Slack or Mastodon.

The Best Way to Collect a Flow in Kotlin – launchIn

At some point you’ll need to collect (receive items) from a Flow (reactive stream) within a Kotlin Coroutine.  More than likely you will use a launch on a CoroutineScope, and then collect like this:

scope.launch {
  flow
    .onEach { println(it) }
    .collect()
}

This works great, but there is a better way for most use cases. It’s using a function called launchIn. What’s launchIn? It’s just shorthand to do what you did above. This is the equivalent logic as above, but using launchIn.

flow
  .onEach { println(it) }
  .launchIn(scope)

This is less code to write, but more importantly it’ll get you out of some hard to debug situations when collecting from Flows. The non obvious thing to understand is that collect() will block the coroutine until the flow has finished emitting. This behavior is sometimes desired, but for me it’s not in most cases.

In the example below, you’d think that both Flows are being collected at the same time, but flow1 is collected until the Flow finishes emitting, and then flow2 is collected until it is finished emitting.

scope.launch {
  flow1
    .onEach { println(it) }
    .collect()
  
  // Will not run until flow1 finishes emitting
  flow2
    .onEach { println(it) }
    .collect()
}

To collect both in parallel, you’d need to write this:

scope.launch {
  flow1
    .collect { println(it) }
}
scope.launch {
  flow2
    .collect { println(it) }
}

This is where launchIn comes to the rescue to make this reach much easier in my opinion. Here is the equivalent using launchIn:

myFlow1
  .onEach { println(it) }
  .launchIn(coroutineScope)
myFlow2
  .onEach { println(it) }
  .launchIn(coroutineScope)

I like launchIn because it’s less code to write, I don’t have to have indentation, and I just found it easier to understand.

In no way does this mean that the normal launch() and collect() aren’t great things to use, but for most use cases, I’d suggest considering using launchIn().

Wrapping Mockito Mocks for Reusability

My general advice about Mockito is to try and avoid it when you can. Ryan Harter has an awesome companion post called Replacing Mocks which shows some potential pitfalls of using Mockito Mocks, as well as how to avoid using it by restructuring code. However, sometimes Mockito can be the right tool to use for mocking dependencies in a unit test when a code refactor isn’t possible due to constraints. I use Mockito-Kotlin which helps leverage Mockito in Kotlin code.

In this post I show how you can wrap a Mockito mock to avoid using verbose syntax (“whenever”, “verify”, etc.) all over the place. I call this wrapper around the Mockito mock a “Fake”.

// Fake Wrapper around Mockito Mock (See implementation below)
val fakeOven = FakeOven()

// Access and Use Mockito Mock
val oven : Oven = fakeOven.mock

// Clean API to Setup Mocks (using Wrapper)
fakeOven.givenOvenResult(OvenResult.Success)

// Clean API to Verify Mocks (using Wrapper)
fakeOven.thenOvenSetTo(temperatureFahrenheit = 350, timeMinutes = 30)

Benefits:

  • Single Responsibility – Mocking logic out of your test class.
  • Cleaner Tests – Avoid using “when”, “whenever” and “verify” all over the place.
  • Less Duplication – Can be reused across tests and for future tests you may write.

Example: Baking with an Oven

In this example we bake a Cake which requires an Oven. We need to mock the Oven.

NOTE: We could try various approaches for this example, but for the purpose of explaining this strategy, we’ll use the “Fake” Mockito wrapper.

/** Class that uses [Oven] */
class Dessert(val oven: Oven) {
    fun bakeCake(): OvenResult {
        oven.setTemperatureFahrenheit(350)
        oven.setTimeMinutes(30)
        return oven.start()
    }
}
/** Class we will use Mockito to Mock */
class Oven {
    fun setTemperatureFahrenheit(tempF: Int) {
        // ...
    }

    fun setTimeMinutes(minutes: Int) {
        // ...
    }

    fun start(): OvenResult {
        // ...
    }
}
/** Whether the Oven command was successful, or something happened */
sealed class OvenResult {
    object Success : OvenResult()
    data class Failure(val e: Exception) : OvenResult()
}

Original Test 🤷🏽‍♂️

import com.nhaarman.mockitokotlin2.mock
import com.nhaarman.mockitokotlin2.verify
import com.nhaarman.mockitokotlin2.whenever
import org.junit.Test

/** Test Dessert Baking */
class DessertTest {

    @Test
    fun bakeCakeSuccess() {
        val oven: Oven = mock()
        val dessert = Dessert(oven)

        // Setup
        whenever(oven.start()).thenReturn(OvenResult.Success)

        // Execute Code
        dessert.bakeCake()

        // Verification
        verify(oven).setTemperatureFahrenheit(350)
        verify(oven).setTimeMinutes(30)
    }
}

FakeOven – Mockito Mock Wrapper 🤔

/** Wraps the Mockito mock for reuse */
class FakeOven {

    val mock: Oven = mock()

    fun givenOvenResult(ovenResult: OvenResult) {
        // Setup
        whenever(mock.start()).thenReturn(ovenResult)
    }

    fun thenOvenSetTo(temperatureFahrenheit: Int, timeMinutes: Int) {
        // Verification
        verify(mock).setTemperatureFahrenheit(temperatureFahrenheit)
        verify(mock).setTimeMinutes(timeMinutes)
    }
}

Updated Test – Using Fake Mockito Wrapper ✅

class DessertTestWithFake {

    @Test
    fun bakeCakeSuccess() {
        val fakeOven = FakeOven()
        val dessert = Dessert(fakeOven.mock)

        fakeOven.givenOvenResult(OvenResult.Success)
        dessert.bakeCake()
        fakeOven.thenOvenSetTo(
            temperatureFahrenheit = 350,
            timeMinutes = 30
        )
    }
}

We use “fakeOven.mock” to fulfill the “Oven” dependency, and control the behavior using the wrapper we have created.

val fakeOven = FakeOven()
val oven : Oven = fakeOven.mock

Conclusion

Isolate usage of Mockito, and avoid scattering it all over your tests. By using this pattern of wrapping a Mockito Mock in a fake, your tests that require Mockito are a little bit better.

Running Multiple Android Emulators Simultaneously on OSX

I had a long standing issue where I could only launch two emulators on my Macbook Pro simultaneously.  Any other emulators would launch and get a black screen and wouldn’t load.  I accepted this as fact, and carried on with life.

screen-shot-2016-09-07-at-7-11-45-pm

Finally today I found the need to figure out “why” this was the case as I wanted to start sharding my Android UI tests to speed them up.  I was given the suggestion that it could be the # of CPUs or the amount of RAM.  If you look in the logs you may see something like this (if you launch the emulator from android avd):

screen-shot-2016-09-07-at-7-15-46-pm

or you may see:

“HAXM does not have enough memory remaining to load this AVD.”

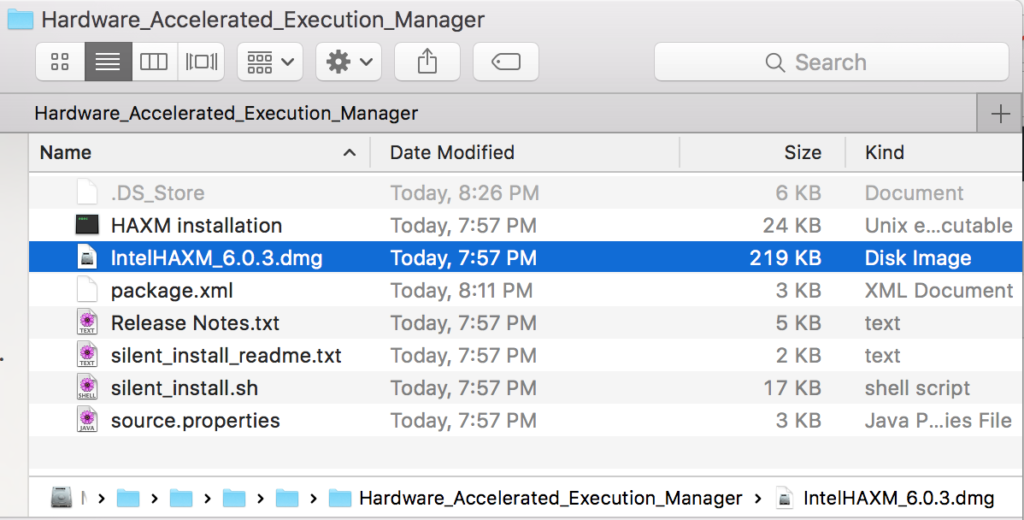
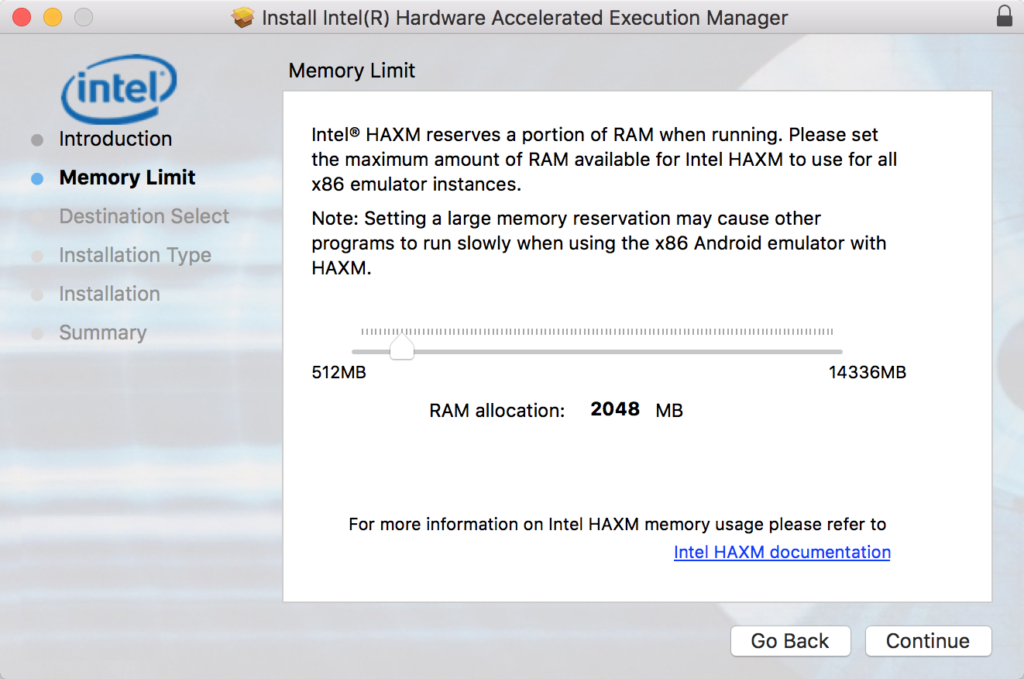
In order to change your memory allocation for HAXM, you need to re-install it, so run the installer again which is a DMG at: [$ANDROID_HOME/sdk/extras/intel/Hardware_Accelerated_Execution_Manager/ ] and this time select more memory. [HAXM Technical Docs]screen-shot-2016-09-07-at-8-27-05-pm

But… before you install, make sure you have the latest version. The latest version as of September 7th, 2016 is 6.0.3 (Which was released on June 21, 2016).
screen-shot-2016-09-07-at-7-33-01-pm

On my Macbook, I was given 2048MB of memory by default which allowed me to run 2 emulators simultaneously (as seen above).screen-shot-2016-09-07-at-6-58-46-pm

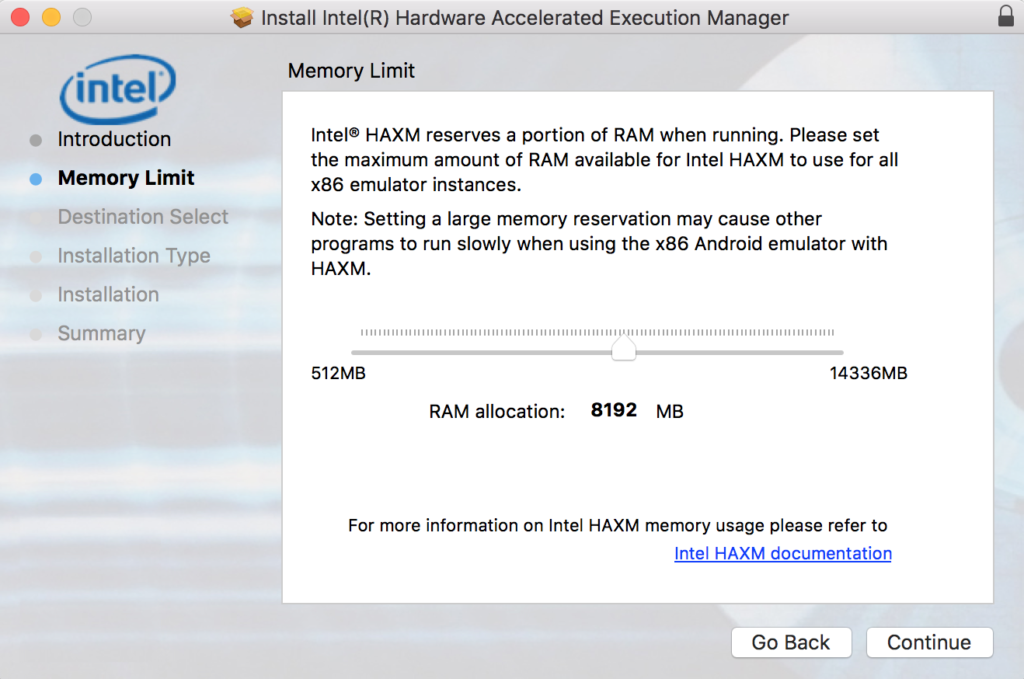
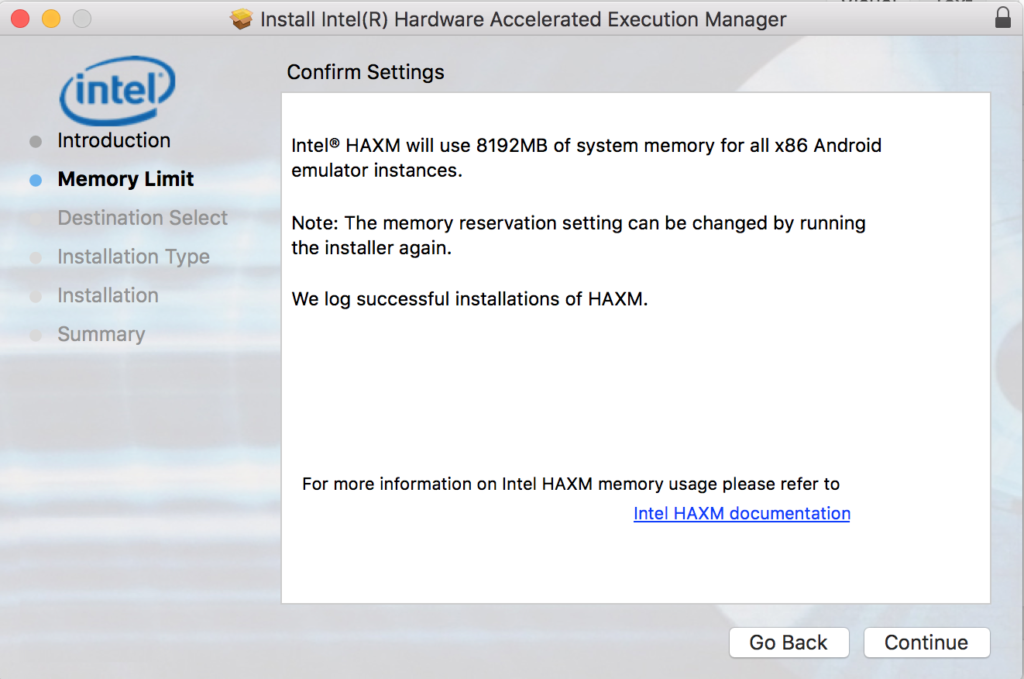
I have 16GB total memory though, so lets make it so I can run a bunch of emulators at once by allocating 8GB 🙂
8192
confirm

Here is my Macbook Pro running 6 Android emulators simultaneously after the changes:
screen-shot-2016-09-07-at-8-17-17-pm

Success!!!  May the sharding begin!

Related Links:

Continuous Integration at LesFurets.com – Richmond Java Users Group (RJUG)

“Our highest priority is to satisfy the customer through early and continuous delivery of valuable software.” – 1st principal of the Agile Manifesto

This presentation by Raphaël Brugier (@rbrugier) at the Richmond Java Users Group last night (Feb 17th) was really good and highlighted:

  • Continuous Integration.  A case study of LesFurets.com. 40,000 unit tests running in 3 minutes.  Selenium tests running in 15 minutes.  Passing tests == shippable code.
  • They went from shipping a feature in a month, to as soon as ready (possibly only a few days).
  • A different kind of Git Flow using git octopus. – https://github.com/lesfurets/git-octopus
  • They have new developers hit the deploy button their first day.  Share deployment responsibilities within the dev team.
  • “If it hurts, do it more often.” – In regards to doing a deployment/release.
  • Work on feature branches.  Ship features as ready, not based on sprints. (git octopus facilitates this)
  • Detect feature branch merge conflicts after every push and make sure it’s resolved ASAP.
  • QA is owned by developers and sign off is given by product when dev demos it.
  • and more…

I would highly recommend watching the recording of the event.  Heads up: The speaker had a French accent and the video is from my MacBook’s camera, however, you get to watch it and otherwise you wouldn’t be able to :-p.

YouTube Link: https://www.youtube.com/watch?v=uTOPvC3lV1Q

Slides: http://www.slideshare.net/raphaelbrugier/continuous-delivery-journey-at-lesfuretscom

Meetup Info: http://www.meetup.com/Richmond-Java-Users-Group/events/226909145/

Running WireMock on Android

Update: (September 17th, 2017) – WireMock 2.8.0 is the latest working version on Android at this point in time.  Check out https://github.com/handstandsam/AndroidHttpMockingExamples and https://github.com/handstandsam/ShoppingApp for the latest examples as this blog post was written in January of 2016.


WireMock on Android is now possible!  Thanks to work by @tomakehurst with the 2.0-beta branch of WireMock to revamp the dependency structure from the 1.0 branch, and a tiny change I put in to match Android’s HttpClient method signatures, it can now run on Android without any modifications.

WireMock includes the following features out of the box which are very valuable in a wide variety of development and testing scenarios:

  • HTTP response stubbing, matchable on URL, header and body content patterns
  • Request verification
  • Runs in unit tests, as a standalone process or as a WAR app
  • Configurable via a fluent Java API, JSON files and JSON over HTTP
  • Record/playback of stubs
  • Fault injection
  • Per-request conditional proxying
  • Browser proxying for request inspection and replacement
  • Stateful behaviour simulation
  • Configurable response delays

It’s true you don’t have to put WireMock on your Android device to use it.  You can also just run WireMock on a computer and get a lot of benefit out of this by pointing your HTTP calls to your computer.  This can be very useful during development and testing, but will require you to manage these mock files separate from your Android application. When you run WireMock on your computer, you’re creating a configuration dependency which is challenging to maintain for scripted testing scenarios.  By including WireMock in your Android project and starting the server programmatically, you are able to remove the dependency of having to run an external server.

Here are your build.gradle dependencies to bundle WireMock 2.0.8-beta into your Android project:

compile("com.github.tomakehurst:wiremock:2.0.8-beta") {
    //Allows us to use the Android version of Apache httpclient instead
    exclude group: 'org.apache.httpcomponents', module: 'httpclient'

    //Resolves the Duplicate Class Exception
    //duplicate entry: org/objectweb/asm/AnnotationVisitor.class
    exclude group: 'asm', module: 'asm'

    //Fixes Warning conflict with Android's version of org.json
    //org.json:json:20090211 is ignored for debugAndroidTest as it may be conflicting with the internal version provided by Android.
    exclude group: 'org.json', module: 'json'
}
//Android compatible version of Apache httpclient.
compile 'org.apache.httpcomponents:httpclient-android:4.3.5.1'

If you want an example of what it looks like to use a bundled WireMock instance in an Android test, check out an examples repository on GitHub I put together to show this.

Here is an Espresso Test from the examples project:

@RunWith(AndroidJUnit4.class)
public class WireMockActivityInstrumentationTestCase2 extends ActivityInstrumentationTestCase2 {
    private MainActivity activity;

    public WireMockActivityInstrumentationTestCase2() {
        super(MainActivity.class);
    }

    @Rule
    public WireMockRule wireMockRule = new WireMockRule(BuildConfig.PORT);

    @Before
    @Override
    public void setUp() throws Exception {
        super.setUp();
        injectInstrumentation(InstrumentationRegistry.getInstrumentation());
        activity = getActivity();
    }
    @Test
    public void testWiremock() {
        String jsonBody = asset(activity, "atlanta-conditions.json");
        stubFor(get(urlMatching("/api/.*"))
                .willReturn(aResponse()
                        .withStatus(200)
                        .withBody(jsonBody)));

        String serviceEndpoint = "http://127.0.0.1:" + BuildConfig.PORT;
        activity.setWeatherServiceManager(new WeatherServiceManager(serviceEndpoint));

        onView(ViewMatchers.withId(R.id.editText)).perform(typeText("atlanta"));
        onView(withId(R.id.button)).perform(click());
        onView(withId(R.id.textView)).check(matches(withText(containsString("GA"))));
    }
}

Full Source File on GitHub

If you’re using WireMock for only testing or mock scenarios, you can justify the dependency overhead of including the library because of it’s vast array of features.  But, I wouldn’t suggest embedding it into your normal app as it has a very large method count and size footprint.  Here’s a breakdown of how big WireMock and it’s dependencies are:

Screen Shot 2016-01-30 at 8.23.55 PM
Source: http://www.methodscount.com/?lib=com.github.tomakehurst:wiremock:2.0.8-beta

That puts us at a total of 54,691 methods if you include WireMock 2.0.8-beta in your project by itself. Wowsa, that’s a lot, especially with Android’s 65,000 Method Limit (which can be circumvented using a technique called MultiDex).

Dependency exclusions & inclusions for WireMock to run on Android:

  • Exclude: org.apache.httpcomponents:httpclient (-4,098 Methods)
  • Exclude: org.json:json (-357 Methods)
  • Exclude: asm:asm (-391 Methods)
  • Include: org.apache.httpcomponents:httpclient-android (+3,389 Methods)

Grand Total Method Count for Android: 53,234

Grade dependencies tree for WireMock 2.0.8-beta:

+--- com.github.tomakehurst:wiremock:2.0.8-beta
|    +--- org.eclipse.jetty:jetty-server:9.2.13.v20150730
|    |    +--- javax.servlet:javax.servlet-api:3.1.0
|    |    +--- org.eclipse.jetty:jetty-http:9.2.13.v20150730
|    |    |    \--- org.eclipse.jetty:jetty-util:9.2.13.v20150730
|    |    \--- org.eclipse.jetty:jetty-io:9.2.13.v20150730
|    |         \--- org.eclipse.jetty:jetty-util:9.2.13.v20150730
|    +--- org.eclipse.jetty:jetty-servlet:9.2.13.v20150730
|    |    \--- org.eclipse.jetty:jetty-security:9.2.13.v20150730
|    |         \--- org.eclipse.jetty:jetty-server:9.2.13.v20150730 (*)
|    +--- org.eclipse.jetty:jetty-servlets:9.2.13.v20150730
|    |    +--- org.eclipse.jetty:jetty-continuation:9.2.13.v20150730
|    |    +--- org.eclipse.jetty:jetty-http:9.2.13.v20150730 (*)
|    |    +--- org.eclipse.jetty:jetty-util:9.2.13.v20150730
|    |    \--- org.eclipse.jetty:jetty-io:9.2.13.v20150730 (*)
|    +--- org.eclipse.jetty:jetty-webapp:9.2.13.v20150730
|    |    +--- org.eclipse.jetty:jetty-xml:9.2.13.v20150730
|    |    |    \--- org.eclipse.jetty:jetty-util:9.2.13.v20150730
|    |    \--- org.eclipse.jetty:jetty-servlet:9.2.13.v20150730 (*)
|    +--- com.google.guava:guava:18.0
|    +--- com.fasterxml.jackson.core:jackson-core:2.6.1
|    +--- com.fasterxml.jackson.core:jackson-annotations:2.6.1
|    +--- com.fasterxml.jackson.core:jackson-databind:2.6.1
|    |    +--- com.fasterxml.jackson.core:jackson-annotations:2.6.0 -> 2.6.1
|    |    \--- com.fasterxml.jackson.core:jackson-core:2.6.1
|    +--- org.skyscreamer:jsonassert:1.2.3
|    +--- xmlunit:xmlunit:1.6
|    +--- com.jayway.jsonpath:json-path:2.0.0
|    |    +--- org.slf4j:slf4j-api:1.7.10 -> 1.7.12
|    |    \--- net.minidev:json-smart:2.1.1
|    |         \--- net.minidev:asm:1.0.2
|    +--- org.slf4j:slf4j-api:1.7.12
|    +--- net.sf.jopt-simple:jopt-simple:4.9
|    \--- junit:junit:4.12 (*)
\--- org.apache.httpcomponents:httpclient-android:4.3.5.1

My recommendation: If you need the features WireMock provides, go with it.  It’s sexy and it works well.  WireMock has a lot of bang for the buck, and you’re only taking this overhead in test and mock build flavors.  If you’re looking for something WAY more basic on Android, try okhttp’s MockWebServer project.  It does allow you to run an HTTP server within your app but it’s very limited and that makes it lightweight.  You can queue up responses in a row, or create a custom “dispatcher” which allows you to choose which response to send back based on a request.  It really depends on your use cases as to which one you choose.  There is also an example of MockWebServer being used in the same AndroidHttpMockingExamples project on GitHub.  Note: the examples are there mostly for configuration but don’t exercise all of WireMock’s features.  In this examples project, you will see that MockWebServer is an equally viable solution because of the simplicity of this use case.

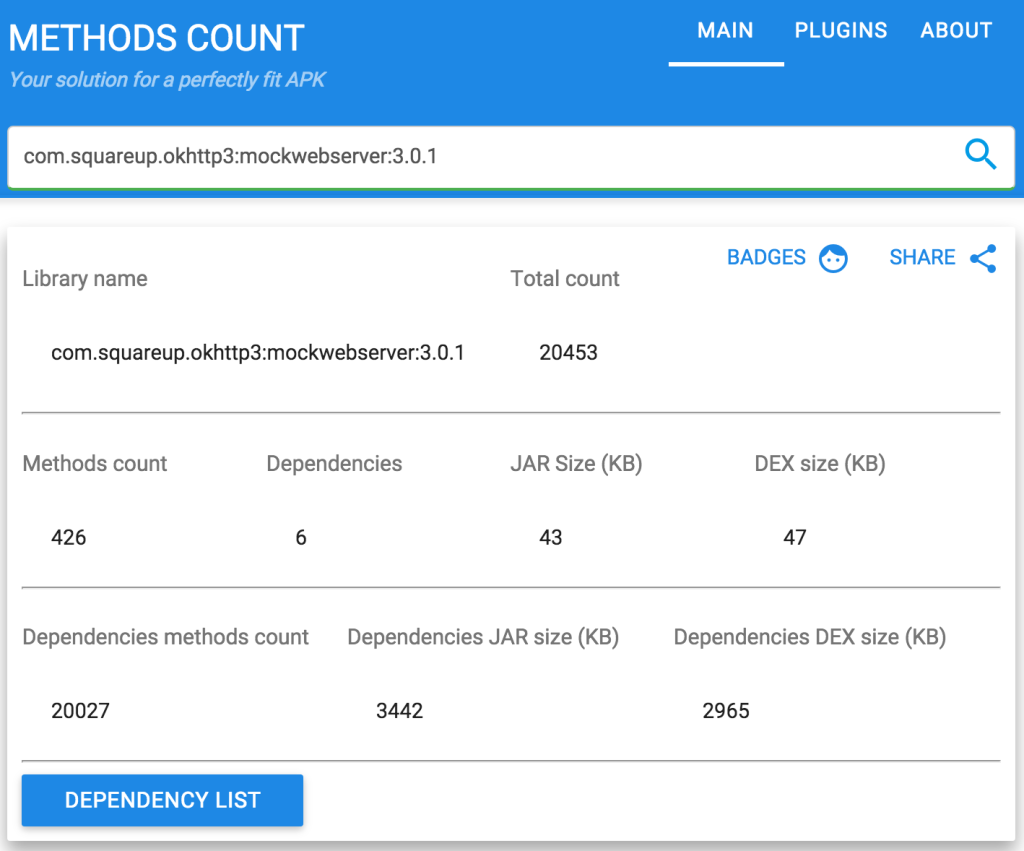
The latest version of okhttp’s MockWebServer has 20,453 methods, but that includes okhttp and junit which you are probably already using in your project.  The biggest culprit is BouncyCastle (a java implementation of many encryption algorithms) which has 15,163 on it’s own.

Screen Shot 2016-01-30 at 9.54.32 PM

Source: http://www.methodscount.com/?lib=com.squareup.okhttp3:mockwebserver:3.0.1

Gradle Dependencies for okhttp’s MockWebServer:

\--- com.squareup.okhttp3:mockwebserver:3.0.1
     +--- com.squareup.okhttp3:okhttp:3.0.1
     |    \--- com.squareup.okio:okio:1.6.0
     +--- com.squareup.okhttp3:okhttp-ws:3.0.1
     |    \--- com.squareup.okhttp3:okhttp:3.0.1 (*)
     +--- org.bouncycastle:bcprov-jdk15on:1.50
     \--- junit:junit:4.11 -> 4.12 (*)

Related Info: If you just want a little more info and more advanced use cases about how to use WireMock on Android using Espresso UI tests, Michael Bailey has a great talk up on YouTube from 2014.  He talks about how he used an embedded WireMock instance on Android that he hacked together for version 1 of WireMock (library is not publicly available).  He shows some really good examples and I highly recommend watching the talk.

Finally: One thing I haven’t figured out how to do on Android yet is to use the “__files” and “mappings” directories the same way you can on a computer.  If anyone knows how to get this to work, or a nice work-around, please let me know.

Are you using WireMock on Android?  If so, please let me know on Twitter by tweeting @HandstandSam, I’d love to know.