Jetpack Compose – Text Shadows

This post is a journey of the steps I took while figuring out how to do a Text Shadow with Jetpack Compose. If you want to skip the journey and just get the solution, jump to the end of the post!


As of version 1.0 of Jetpack Compose, Text Shadows don’t exist in the same way they used to on TextView. 😿

Adding a Shadow on a TextView looked like this:

<TextView
    android:id="@+id/text"
    style="@style/CategoryRowTitle"
    tools:text="Category" />
<style name="CategoryRowTitle" parent="TextAppearance.AppCompat">
    <item name="android:textSize">24sp</item>
    <item name="android:textColor">@color/white</item>
    <item name="android:shadowColor">@color/black</item>
    <item name="android:shadowDx">4</item>
    <item name="android:shadowDy">4</item>
    <item name="android:shadowRadius">8</item>
</style>

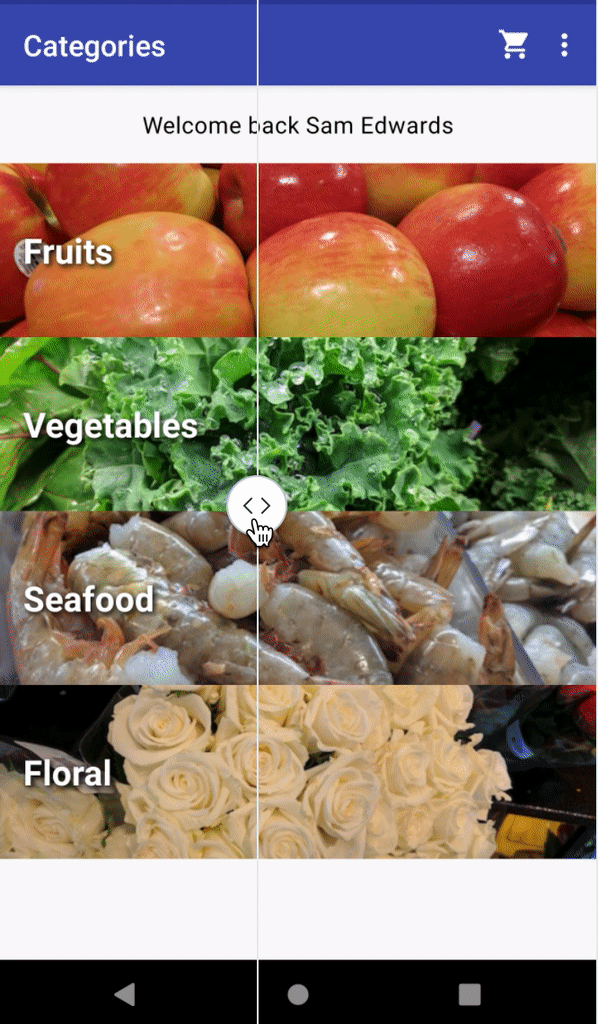
Adding a Shadow to Text in Jetpack Compose

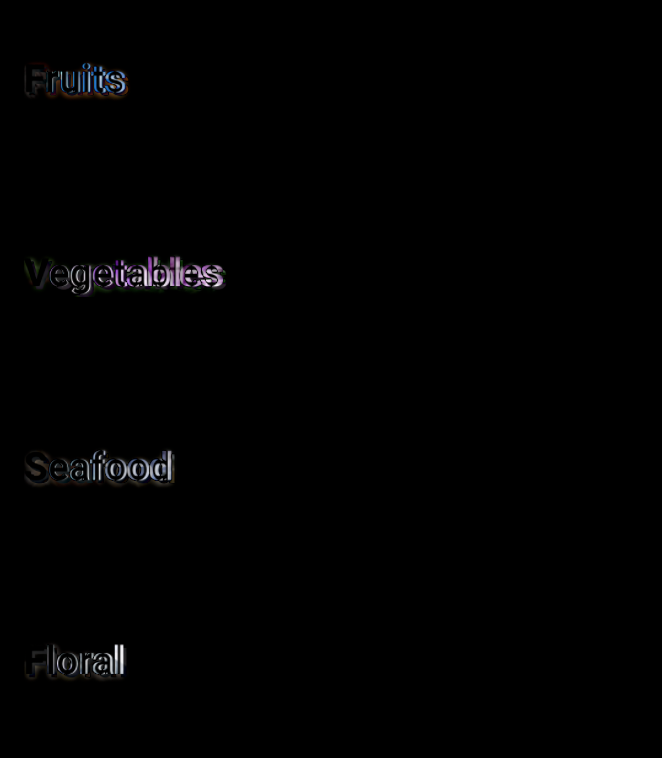
You try can put a “shadow” on your Text Composable, but it’ll create a shadow behind the text container, not the actual characters. 🤔

Text(
    text = "Fruits",
    modifier = Modifier
        .shadow(elevation = 2.dp)
)

Creating a Custom Shadow in Jetpack Compose

I did my best to create a shadow myself by making a copy of the text, setting it to a dark color, and offsetting it by 2.dp.

@Composable
fun TextWithShadow(
    text: String,
    modifier: Modifier
) {
    Text(
        text = text,
        color = Color.DarkGray,
        modifier = modifier
            .offset(
                x = 2.dp,
                y = 2.dp
            )
            .alpha(0.75f)
    )
    Text(
        text = text,
        color = Color.White,
        modifier = modifier
    )
}

Looks great! But small differences.

Let’s Cheat and Use an AndroidView in Compose 😃

Compose has amazing interoperability with the Android View system. If something isn’t perfect in Compose, we can always just use the Android View version. Pixel perfect match! However, this wouldn’t work in Compose for Desktop because it keeps us tied to the Android View system.

@Composable
fun ComposeAndroidTextView(
    text: String,
    modifier: Modifier
) {
    AndroidView(
        modifier = modifier,
        factory = { context ->
            AppCompatTextView(context).apply {
                setTextAppearance(R.style.ItemRowTitle)
                this.text = text
            }
        }
    )
}

Let’s Try Again with Compose… StackOverflow? 🤔

I did find this Stack Overflow post that was similar, but not exactly what I needed. Here is what it had:

val textPaintStroke = Paint().asFrameworkPaint().apply {
    isAntiAlias = true
    style = android.graphics.Paint.Style.STROKE
    textSize = 64f
    color = android.graphics.Color.BLACK
    strokeWidth = 12f
    strokeMiter = 10f
    strokeJoin = android.graphics.Paint.Join.ROUND
}

val textPaint = Paint().asFrameworkPaint().apply {
    isAntiAlias = true
    style = android.graphics.Paint.Style.FILL
    textSize = 64f
    color = android.graphics.Color.WHITE
}

Canvas(
    modifier = Modifier.fillMaxSize(),
    onDraw = {
        drawIntoCanvas {
            it.nativeCanvas.drawText(
                "Sample",
                0f,
                120.dp.toPx(),
                textPaintStroke
            )
            it.nativeCanvas.drawText(
                "Sample",
                0f,
                120.dp.toPx(),
                textPaint
            )
        }
    }
)

What’s the Perfect Way to Match a TextView Shadow with Compose?

I’m not really sure. Update: I figured it out thanks to Antonio Leiva!

style = MaterialTheme.typography.h4.copy(
    shadow = Shadow(
        color = shadowColor,
        offset = Offset(4f, 4f),
        blurRadius = 8f
    )
)

I wanted to share my journey in figuring this out, but also thank everyone in the community for helping find the “right” way to do it in compose!

DIY Projector Movie Theater for $545.34

This post goes into the setup I ended up with for my DIY Movie Theater. I’m not an A/V purist, so take that into consideration.

The original reason I wanted to get a projector was so I could watch a movie outside with my kids, but then it snowballed a bit. The budget projectors in the $100-$150 range didn’t have great reviews, and I wanted something a little better. This post shows what I ended up with that is now hobbled together. It works pretty great, after some trouble shooting.

Problem 1: Dolby Digital Audio

These cheaper projectors can’t process audio when it is encoded for 5.1 surround sound. When I played a kids show like “Mickey Mouse Clubhouse”, the projector played sound fine, but when I tried a movie, there was no audio at all. I went down a few rabbit holes, but finally figured out that the projector couldn’t handle Dolby Digital Audio.

I thought that bluetooth could help here, but that doesn’t work with dolby audio either, and the bluetooth audio just didn’t hold up at high volumes. It would sometimes make cracking noises.

In order to listen to something with Dolby Digital Audio, you’ll have to strip out the audio before it gets to the projector. Some people would use a stereo receiver, but I got an HDMI audio extractor and that does the trick. It’s another adapter to bring along, but allows the audio to be pulled from the HDMI signal, but then allows the HDMI signal to carry on to the projector.

Problem 2: Video Source

The projector I got doesn’t have any software on it like Chromecast or Roku, so you’ll have to bring that yourself. That works well if you’re in range of your WiFi signal, but if you go away from there, be ready to have something that hooks offline via HDMI, or USB. Another thing to note is that you may think your Phone can just be mirrored to the screen, but many video apps will show a blank screen for it.

It Finally Works! 🧟

We just finished watching The Mandalorian on Disney+ on the “Movie Theater”, and it was a MUCH better experience than watching it on our 55 inch 4k TV (That we had got on sale for $330 2.5 years ago). Having it on a big screen just really makes it something you “feel” instead of just “watch”.

The Hardware

TOTAL Price: $545.34

Final Thoughts

The projector quality at 1080p is good, but it’s not REALLY good. It’s enough for me though, and we control the amount of light in the basement, so the picture is nice. I got the soundbar later on after trying some bluetooth speakers, and that made a huge difference. Having a large, high quality projector screen is critical, but if you have weak sound, it’s just not the same.