Kotlin Multiplatform: Building a “Fat” iOS Framework for iosArm64 and iosX64

If you are building a Kotlin Multiplatform library which will be consumed by an existing iOS application, using a framework is a great way to do this. Frameworks are typically compiled for a specific target architecture which can then be run on an iPhone, iPad or iOS Simulator on your Intel Macbook.

If you are going use your Kotlin Multiplatform library as a framework in an existing app, you will want to provide a “Fat” framework which will contain both Arm64 and X64 architectures. This article contains the configuration I used to build the “Fat” framework. This is not a full build.gradle.kts file, but just the additional parts needed for a Kotlin Multiplatform project to build a “Fat” framework.

⚠️Use an XCFramework instead ⚠️

This “Fat” framework method no longer works with XCode 12+. Use an XCFramework instead.


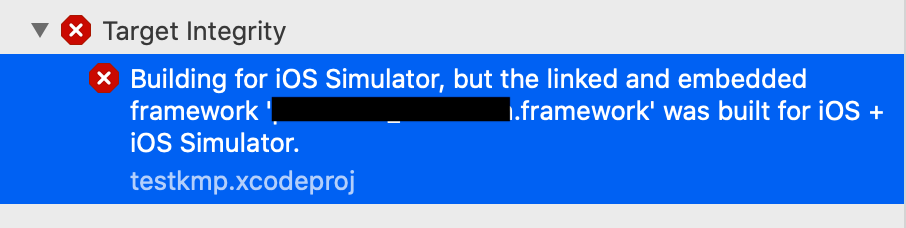
I ended up with this Error Message in XCode 12.4: “Building for iOS Simulator, but the linked and embedded framework ‘my_library.framework’ was built for iOS + iOS Simulator.”

This Stack Overflow post shows you how to create an XCFramework from your two frameworks, and I’ll follow up with a blog post on how to do it with an XCFramework a bit later. This solutions ends up combining the two frameworks into a single XCFramework.

xcrun xcodebuild -create-xcframework \
    -framework /path/to/ios.framework \
    -framework /path/to/sim.framework \
    -output combined.xcframework

Custom Gradle Task to Build “Fat” framework

import org.jetbrains.kotlin.gradle.tasks.FatFrameworkTask

kotlin {
    // Set a name for your framework in a single place and reuse the variable
    val libName = "my_library"

    // Configure your Kotlin Multiplatform lib to generate iOS binaries
    // NOTE: This will only work on Macs
    ios {
        binaries.framework(libName)
    }

    // You can choose your output directory
    val frameworkDestinationDir = buildDir.resolve("cocoapods/framework")

    tasks {

        // Custom task to build the DEBUG framework
        // ./gradlew universalFrameworkDebug
        register("universalFrameworkDebug", FatFrameworkTask::class) {
            baseName = libName
            from(
                iosArm64().binaries.getFramework(libName, "Debug"),
                iosX64().binaries.getFramework(libName, "Debug")
            )
            destinationDir = frameworkDestinationDir
            group = libName
            description = "Create the debug framework for iOS"
            dependsOn("linkDebugFrameworkIosArm64")
            dependsOn("linkDebugFrameworkIosX64")
        }

        // Custom task to build the RELEASE framework
        // ./gradlew universalFrameworkRelease
        register("universalFrameworkRelease", FatFrameworkTask::class) {
            baseName = libName
            from(
                iosArm64().binaries.getFramework(libName, "Release"),
                iosX64().binaries.getFramework(libName, "Release")
            )
            destinationDir = frameworkDestinationDir
            group = libName
            description = "Create the release framework for iOS"
            dependsOn("linkReleaseFrameworkIosArm64")
            dependsOn("linkReleaseFrameworkIosX64")
        }
    }
}

Here are two custom gradle tasks that build a “Fat” framework for debug or release. In this I have it outputting to the build/cocoapods/framework directory, but you can configure that as you like.

Gradle Task for “Fat” iOS framework

  • Build a “Fat” debug version of the framework
    • ./gradlew universalFrameworkDebug
  • Build a “Fat” release version of the framework
    • ./gradlew universalFrameworkRelease

Importing the iOS Framework into XCode

I previously wrote a blog post about how to do this which has a companion video along with it. 👇

Thanks and Related Resources

I didn’t figure this all out myself. I just got it to work for me and extracted out the bare minimum you need to make this work. Thanks to Swapnil Patil for letting me know that “Fat” frameworks are possible. Thanks so much to Marco Gomiero for his post Introducing Kotlin Multiplatform in an existing project.

Run Custom Gradle Task After “build”

After running ./gradlew build on my Kotlin Multiplatform project, I wanted to copy the JavaScript build artifacts (.js & .html) to publish a demo where someone could test my library via a web browser. A custom Gradle task is is a great way to write your own behavior to accomplish this using the Gradle build system.

My Custom Gradle Task

I found the Gradle documentation for how to copy files, and was able to write this custom task "myTaskName" to do it. You can then just run ./gradlew myTaskName and it’ll run the task independently. The problem was that I didn’t know how to get it to always run after ./gradlew build ran.

/** Copies files from "build/distributions" to "demo" directory */
tasks.register<Copy>("myTaskName") {
    println("Copying Build Artifacts!!!")
    from(layout.buildDirectory.dir("distributions"))
    include("**/*.*")
    into(layout.buildDirectory.dir("../demo"))
}

TL;DR – Use finalizedBy()

  • finalizedBy – Runs my task AFTER “build”. ✅
    • tasks.named("build") { finalizedBy("myTaskName") }
  • dependsOn – Runs “build” BEFORE my task, if my task is executed explicitly.
    • tasks.named("myTaskName") { dependsOn("build") }

To give you more details and to go into my process of how I figured it out, here are a few options I tried while figuring out how to run this custom task after every execution of the “build” Gradle task.

1. finalizedBy ✅

You can use finalizedBy() to say what task you should run after a named task. I think this reads nicely because it calls out the task dependency separately from it’s declaration. This will appropriately run after the build task executes as I needed.

tasks.named("build") { finalizedBy("myTaskName") }

2. shouldRunAfter 🤔

Another possible way to do this is with shouldRunAfter() which can just be added inside the block where you register your custom task. This will run after the build task executes. HOWEVER: I had to call .get() after registering my task to get it to work in order to have this actually run, which just feels wrong… Someone feel free to explain why, but I’m guessing this is some sort of lazy initialization happening if I don’t call “.get()”. Because of this, I don’t like this solution personally.

tasks.register<Copy>("myTaskName") {
    shouldRunAfter("build") // Tells Gradle to execute after "build" task
    // My Custom Task Code
}.get()

3. dependsOn() 🙃

You would think dependsOn() may work, but it’s the opposite behavior than what I wanted. It’s saying that “myTaskName” needs “build” to have run before it executes. It’s the opposite task dependency relationship from finalizedBy(). This wasn’t the behavior I wanted for this use case because I wanted it to copy the artifacts after every time a ./gradlew build was run, but could be useful depending on your use case.

tasks.named("myTaskName") { dependsOn("build") }

Wrap Up

None of this is rocket science, but if you try to Google for how to do it, it may take you a while to figure out how to do it. Using Option 1, finalizedBy() was the solution that worked for my use case! I hope this saved you an hour or more!

Unlocking Biometric Prompt – Fingerprint & Face Unlock

AndroidX Biometric gives us a single API for supporting Biometrics on Android devices via the BiometricPrompt, and a fallback Fingerprint dialog for API 23-27.  This post does a side-by-side comparison of what it looks like on the Pixel 4, Pixel 3, and an API 26 Emulator to show you what it looks like on different devices, hardware and different builder configurations.

Currently, the Pixel 4 is the only device that supports Face Unlock via the Biometric Prompt. There aren’t even emulators that support it.  I ended up with a Pixel 4, and wanted to create this post with you to save you some 💰 and⌚.

What is the Android Biometric Prompt?

The Android Biometric Prompt was released as part of the Android OS in API 28 (Pie) to replace the FingerprintManager.  Its goal is to make a standard way of interacting with Biometrics via the operating system, and also support multiple types of biometric types such as Fingerprint, Face & TBD.

One of the downsides of the Biometric Prompt is that we are asked to use the terminology “Biometric” instead of “Fingerprint” or “Face” because the BiometricManager doesn’t tell us the type of biometric the user will use.  Read more about how to provide better user experiences through tailored biometric messaging in my previous post.

Using AndroidX Biometric

I’m going to show you various configurations of the library in this post, but refer the documentation from Google for more information.

BiometricPrompt.PromptInfo.Builder()
 .setTitle("Authenticate with Face")
 .setNegativeButtonText("Cancel") 
 .setConfirmationRequired(true)
 .build()
Face Unlock Success

Face Unlock Fail & Retry

Confirmation Required

There is a configuration parameter for Biometric Prompt Info Builder called “setConfirmationRequired” which, when set to false, passively authenticates the user without any interaction (other than looking at the phone). Note: This only works for Face Unlock since a Fingerprint is confirmation.

.setConfirmationRequired(false)

.setConfirmationRequired(true)

NOTE: There is a setting which allows a user to ALWAYS confirm when using Face Unlock, so be aware of that when building your applications.

Conclusion

Use AndroidX Biometric.  It feels like they were still working out the kinks when they release Biometric Prompt in API 28.  The AndroidX Library has some device specific workarounds and the fallback dialog for API 23-27.  It’s weird that there isn’t better documentation about the user experience for each biometric type, which is why I wrote this post. Hopefully you won’t have to spend hundreds of dollars on a Pixel 4 now, and have a better idea of what the Biometric Prompt looks like under different configurations.

Links:

Companion Video on AsyncAndroid

Android Biometrics UX Guide – User Messaging

Users Say: “Biometric…🤷‍♂️🤷‍♀️?”

When I’ve demoed “Biometric” UIs to non-developers, many say:

Why don’t you just say “Fingerprint” or “Face Unlock”?

The reason is that the Biometric APIs have no way to find the type of biometric that will be used.  That’s why we are stuck with using “Biometric” as a catch all.  You can see the terminology being used in Google’s Android Developer Training on Biometric Auth.

We’re also working with the UX / design team on clear iconography/messaging – in the meantime, our suggestion to developers has been to use something along the lines of “Biometric settings”, or “Use biometric”, etc.
– Googler’s Response on Issue Tracker

I have read “BiometricManager” and “BiometricPrompt” enough times to get used to it, but users haven’t.  So let’s see what we can do to create better user messaging.

Option A: Describe “What” Instead of “How”

Say what the user is going to do like “Unlock” or “Login” or “Confirm” or whatever.  Just don’t mention how the user will do it via a biometric.  The system will show the UX for the biometric type anyways in the Biometric Prompt, but your customized wording will be whatever you provide.


Consider these scenarios as well:

  • What will you call this on your settings page?
  • What iconography will you use for “Biometric” on a Pixel 4 with Face Unlock? A Fingerprint?  That’s not ideal.
  • How will you encourage your users to use biometrics in your app?  Maybe you could say “Unlock Faster Next Time” and it can be implied that a biometric will be used?

You might be able to get away with this messaging, and if you can, congrats! 🎉

Option B: Write Code and Cross Your Fingers🤞

It’s possible to figure out what biometric will be used the majority of the time, and I’ll show you how. 😎

Running on Pixel 3 Running on Pixel 4

Step 1) See If Device Has Biometric Support

Ask the BiometricManager if it canAuthenticate(), and if it’s successful, or says the user has not enrolled their biometrics, then you know the device is capable.

val biometricManager = BiometricManager.from(context)
val isCapable = when (biometricManager.canAuthenticate()) {
    BiometricManager.BIOMETRIC_SUCCESS,
    BiometricManager.BIOMETRIC_ERROR_NONE_ENROLLED -> true
    else -> false
}

The result of this just tells us that the device is capable of using the BiometricPrompt.

Step 2) Ask PackageManager For Available Features

There are currently only 3 types of Biometrics as of API 29 (Android 10).  The Android PackageManager can be queried to see if these features are available on the device.

// Get Package Manager
val packageManager : PackageManager = context.packageManager

Based on these, you should know, but there are edge cases:

  • One is available – If only one is available and the rest are not, you should feel pretty confident that you know the exact type of biometric that will be used.
  • More than one available – It is possible that a device could have more than one biometric feature.  It could have Face Unlock and Fingerprint.  Android is an open platform, and Google has said that OEMs could do this if they choose.
  • None are available –  If this is the case, and the BiometricManager said you canAuthenticate(), then some sort of biometric is available that we have never seen before.  This could be the case if this code is run on a future version of Android with a Biometric type we don’t know about.

Step 3) Determine Supported Biometrics

Based on all the logic above, we will end up with one of the following results.

sealed class Biometrics {
    object None : Biometrics()
    sealed class Available : Biometrics() {
        object Face : Available()
        object Fingerprint : Available()
        object Iris : Available()
        object Multiple : Available()
        object Unknown : Available()
    }
}

You can then use a “when” statement to create user messaging for a specific biometric hardware type. 🎉

What are future Biometric Types?

We don’t know yet.

Biometric APIs are meant to be more future-looking. We “could” expose something like authenticate(type, info, crypto) etc, but it exposes more API surface and thus has the chance of causing more fragmentation across OEMs.
– Googler’s Response on Issue Tracker

In order to be more open ended, these Biometric APIs are built in a way where generic messaging is the recommended approach currently.

Conflicts with Material Design Guidelines

The Material Design guide for Fingerprint explicitly says to maintain consistency with Android Settings. Such as “Confirm fingerprint”.  The BiometricManager tells us if a user “canAuthenticate()“, but doesn’t tell us what types of Biometrics are available on the device or which one (if more than one) is currently enabled.  The rationale for this:

If new sensors are developed, we would need to keep updating the “type” list, and apps would also need to keep updating to use the new types. Perhaps there’s a way to make that work, just we haven’t spent much time investigating.
– Googler’s Response on Issue Tracker

I think this is a great way to do it, and aligns with user expectations, but this is not available with current Biometric APIs. 😞

Pixel 3 Settings Pixel 4 Settings

Conclusion

This all sounds like a lot of work.  You can just use “Biometric” and you’ll probably be fine.  Users will get used to it eventually, right?  No matter how hard we try at this point, we will end up having to use that terminology in the cases where “Multiple” or “Unknown” biometric features are available anyways.

It kinda stinks that we got forced to use these APIs since FingerprintManager is deprecated, and the Biometric APIs have a lot of these little workarounds you may need to do.  I understand the rationale behind it from an OS standpoint, but I hope that Google exposes the type(s) of Biometric available on the device to use.  That way we are sure, and aren’t doing all this work to try and figure it out.

Recommendations

  1. Must: Use the AndroidX Library.  It’s a wrapper on top of the Android OS APIs and deals with specific workarounds, as well as provides a FingerprintManager fallback for devices prior to API 28 which don’t have a BiometricPrompt in the OS.
  2. Recommended: Checkout Biometricks which is a library in development to do what is mentioned in this article.  It has a sample app and more.
  3. Recommended: Do some user testing.  I’m giving some advice from what I’ve seen, but you may find something different with your users.  Your users are your source of truth.

Disclaimers

  • This is a UX guide, and not anything related to security of using Biometric features of Android.
  • These are my personal observations and opinions.

Related Links

Why We Need “fat” AARs for Android Libraries

I want the ability to create a single (“fat”) AAR artifact from multiple Android Libraries (all from source).  Non-source, transitive dependencies will still be pulled in via a pom.xml file.

Requirements:

  1. I want to write and SDK that would be used by 3rd parties and possibly internal teams.  I want to write modular code on my side, with clean separation of concerns, yet only provide a single AAR artifact to users of my library.  Users of my library don’t need to know how I architected the internals, and in some cases I don’t want them to know.  I want to obfuscate my internal implementations to avoid accidental usage as well as for some security.
  2. I want to shrink and optimize my code with ProGuard (which is being replaced by R8) on my entire library, and generate only a single AAR file.  With current tooling, each module is only aware of its own code and resources when ProGuard is run.  This means that I can’t optimize or obfuscate my entire library/SDK in its entirety.  Because I must run ProGuard on each module individually at the current time, you end up with NoClassDefFoundErrors if you try to be aggressive with obfuscation.

The Use Case

For this post, think of an SDK you would get from an external vendor, or another team that contains their shrink-wrapped code that you need to plop into your app.  For an app like Twitter, that could mean:

  • Login page library
  • Video streaming player library
  • Home feed library
  • Emoji support library
  • etc.

Note: With the Twitter example I just mean to show that you can bundle discrete components of an app with clear boundaries between them.

When you get into a big app, you have to separate out components, and using Android Libraries to do this is a great decision.  That being said, I would never want “fat” AARs to be the only way to do things.  I just think it would solve some use cases when you are creating and SDK to be used by 3rd parties that don’t need to know how the internals of your code work.

Technical Reasons: Why Creating a “FAT” AAR Doesn’t Work

Apps/APKs can combine as many AARs into a single APK artifact.  That’s because there is a Manifest merge process that defines rules on how the AndroidManifest.xml, resources and assets are merged for the resulting APK file.  At the time the APK is created, ProGuard can be applied to optimize all byte code, remove unused classes, and perform code obfuscation.

Didn’t Someone Create a Library to Do This?

Kinda… A long time ago.  There was a partial workaround for manifest merging for Android Libraries using Android Gradle Plugin 2.x called “FAT” AAR, but it was limited, unofficial, and no longer works with Gradle 3.x.  There seems to be no plans to make it work with newer versions of Gradle.  It esentially tried to do its own hacky version of Manifest merging.

Argument Against: You only need to specify a single dependency in your build.gradle to import all of the transitive libraries. Why are you complaining?

This is true for the use case where you publish your artifacts correctly to a public Maven repository.  Your user would only need to care about adding a single Gradle dependency, and the others would be pulled down transitively.  All they would need to add is “com.example:my-lib:1.0.0” to their Gradle dependencies. This works great in a lot of cases, like the Android Support Library, where the dependencies are all published publicly, and users can cherry-pick the pieces they want.

In the use case I’m requesting this for, existing methods aren’t great for 2 reasons.

  1. I want to control what my shrink-wrapped artifacts look like, while still maintaining modularized code internally.  It’s easier to hand over a single AAR file when you need to distribute a library via a non-public Maven repository. Yes, I could ask users to create a file-based maven repository in the project, but that is ugly.
  2. I want to shrink and optimize all of my library before delivering it to users.  It is only possible to run ProGuard on each module individually at the current time, which means that code optimizations and obfuscation breaks when it is used aggressively on each module independently.

Finally

I’ve created this post to explain some of the current limits of building Android Libraries with the Android Gradle Plugin that I’ve run into, and to make a plea to the Android Tooling team to accept the issue for newer versions of Android Gradle Plugin.  ⬇Xavier Ducrohet, the Android SDK Tech Lead said this is being considered for Android Gradle Plugin 3.3, but isn’t on the roadmap yet.  Since 3.2 is almost out the door, I figured now is a good time to make a push for this issue.

If you have this same issue or use case, please ⭐ the issue, but also comment about how this uniquely effects your development.