Kotlin Sealed Interfaces with KotlinX Serialization JSON

I heavily use sealed interfaces to model result objects in Kotlin as they allow me to create a type of classes that can be handled using exhaustive when statements, similar to an enum, but also each type can contain its own properties.

I wanted to serialize these sealed interface Kotlin models to/from JSON over HTTP. There are a bunch of options for serializing JSON in Java like Moshi, Gson and Jackson. While all of those libraries are great, I had a requirement of creating a multi-platform library, and went with KotlinX Serialization.

In this post I’ll walk you through an example of how I configured KotlinX Serialization to work for my use case.

Example: Marketing Campaigns API Result

This endpoint returns a strongly typed campaign, and I wanted to represent this in JSON.

public sealed interface CampaignContent {
    public data class PopupModal(
        public val imageUrl: String,
        public val text: String,
        public val subtext: String,
    ) : CampaignContent

    public data class Link(
        public val linkText: String,
        public val url: String,
        public val linkIcon: String? = null,
    ) : CampaignContent
}
{
  "type": "popup_modal",
  "image_url": "https://...",
  "text": "Text",
  "subtext": "Subtext"
}
{
  "type": "link",
  "link_icon": "https://...",
  "url": "https://..."
}

We need to deserialize a JSON response into a strongly typed object that implements the CampaignContent sealed interface.

fun getCampaignContentFromServer() : CampaignContent

KotlinX Serialization has Polymorphism support allows us to do this. You need to register polymorphic definitions in a SerializersModule that you provide to your Json object that is used to encode and decode objects to/from JSON.

val jsonSerializer = Json {
  serializersModule = SerializersModule {
    polymorphic(
      CampaignContent::class,
      CampaignContent.PopupModal::class,
      CampaignContent.PopupModal.serializer(),
    )
    polymorphic(
      CampaignContent::class,
      CampaignContent.Link::class,
      CampaignContent.Link.serializer(),
    )
  }
}
val campaignContent : CampaignContent = jsonSerializer.decodeFromString(
  CampaignContent.serializer(), 
  jsonString,
)

In order to support polymorphism, a type property is used in the JSON string representation {"type": "..."}. By default this "type" field is a fully qualified classname. This allows KotlinX Serialization know what type to deserialize. You have control over what the name of this classDiscriminator field is, as well as other configuration options when configuring your Json {} serializer.

If you don’t want to use the fully qualified class name as the class type, then you can put a @SerializedName("...") annotation to the class and it will use that name instead of the fully qualified class name. This is helpful for me as the backend did not use fully qualified names, and I had set them explicitly. In the example below I added the @SerializedName("popup_modal") data class.

Final Models after adding @Serializable and @SerializedName

public sealed interface CampaignContent {

  @Serializable
  @SerializedName("popup_model")
  public data class PopupModal(
    @SerializedName("image_url")
    public val imageUrl: String,
    @SerializedName("text")
    public val text: String,
    @SerializedName("subtext")
    public val subtext: String,
  ) : CampaignContent

  @Serializable
  @SerializedName("link")
  public data class Link(
      @SerializedName("link_text")
      public val linkText: String,
      @SerializedName("url")
      public val url: String,
      @SerializedName("link_icon")
      public val linkIcon: String? = null,
  ) : CampaignContent
}

Considerations

At first I made my models match the JSON values as I didn’t have to specify @SerializedName since KotlinX Serialization will just match the field name. After a bit of usage, link.link_text just didn’t feel as correct as link.linkText, so I chose to specify a @SerializedName annotation instead. The resulting Java bytecode is the same as the KotlinX Serialization plugin does code generation that writes out the serializer anyways. This does make your data class look not as pretty, but from the general building and usage perspective of these models, the user will not know.

Conclusion

That was a whirlwind intro, but I had to really dig through deep into the documentation to figure it out and am hoping this helps someone do this faster than I did it originally.
[Experiment] Espresso Closed-Box Testing

I wanted to write some Android Espresso tests for a large application, but iterate on the tests as fast as possible.

Typically someone would run :app:connectedDebugAndroidTest to run their instrumentation tests, but under the hood that is just compiling and installing both the app and androidTest apks, and using the instrumentation runner over adb.

When executing Android Instrumentation Tests, you just need an app.apk and an androidTest.apk, and then to invoke the test instrumentation runner via adb.

Because of the configuration, the androidTest APK gets everything that is on the app‘s classpath so it can reference resources, classes and activities in the app.

The Experiment

I wanted to see if I could build an androidTest.apk without having any ties to the original :app. I tried a few methods, but found that creating a new blank application with the exact same package name, and then writing tests under the androidTest folder allowed me to compile quickly.

Problems:

  1. No access to the classpath & resource identifiers
  2. Classpaths can’t clash (must use same versions of dependencies as the original app).

Workarounds:

  1. You could import just a few modules that have resource identifiers or code that you want to reference in your tests. (easier and typesafe, but a little slower)
  2. OR you could just access everything by fully qualified package names, and look up resource identifiers by ID. (no compile time safety, but faster)

I tried workaround #2, because I wanted to have this be the fastest iteration time possible, and I finally got it to work! Here’s my receipt for how I made it happen.

How I Got it Working

1) Install my app (com.example.app) as usual :app:installDebug.

This will be the app I want to test.

2) Create the :cloneapp project

In this :cloneapp project, keep an empty main source folder, but add an androidTest directory.

3) In :cloneapp set the package name to the the exact same package name com.example.app.

android {
    defaultConfig {
        applicationId "com.example.app"
    }
}

4) In :cloneapp update the src/androidTest/AndroidManfest.xml

<manifest xmlns:android="http://schemas.android.com/apk/res/android"
      xmlns:tools="http://schemas.android.com/tools">
    <instrumentation
        android:name="androidx.test.runner.AndroidJUnitRunner"
        android:targetPackage="com.example.app"
        android:targetProcesses="com.example.app" />
</manifest>

5) Add in a test!

package com.example.app.tests

import android.app.Activity
import android.content.Context
import android.os.SystemClock
import android.util.Log
import androidx.test.core.app.ApplicationProvider
import androidx.test.espresso.Espresso
import androidx.test.espresso.ViewInteraction
import androidx.test.espresso.action.ViewActions
import androidx.test.espresso.assertion.ViewAssertions
import androidx.test.espresso.matcher.ViewMatchers
import androidx.compose.ui.test.junit4.createComposeRule
import org.junit.Before
import org.junit.Rule
import org.junit.Test

fun findResourceIntByIdStr(id: String): Int {
    ApplicationProvider.getApplicationContext().resources.getIdentifier(id, "id", applicationContext.packageName)
    Espresso.onView(ViewMatchers.withId(findResourceIntByIdStr(idStr)))
}

fun findViewByIdStr(idStr: String): ViewInteraction {
    Log.d(TAG, "Find View By ID Str $idStr")
    return 
}

class ExampleTest {

    /** Use this to interact with Compose surfaces */
    @get:Rule
    val composeTestRule = createComposeRule()

    @Test
    fun testLoginFlow() {
        
    }
}

6) Install the test clone APK

Run :cloneapp:installDebugAndroidTest to install the test apk.

7) Run the tests using adb!

adb shell am instrument -w -r com.example.app.test/androidx.test.runner.AndroidJUnitRunner

Note: You can be more explicit with command line instrumentation arguments about what test or test class you want to execute.

8) Test Development Iteration Loop

I ended up clearing the app data between runs with adb shell pm clear com.example.app as well so I had consistent behavior and didn’t have to install the package.

Conclusion

As mentioned, this was an experiment. It made the iteration time blazing fast, but lacked compile time safety. Anyways, it’s possible, and hopefully you learned something. If you end up using this technique, I’m curious to hear more. Feel free to message me on Kotlin Lang Slack or Mastodon.

Organizing @Composables

I saved this post as a draft on February 23, 2021 and never published it. Almost 2 years later this topic came up again, so I want to publish it as a current post to create discussion on the topic. Feel free to ping me on Mastodon with your thoughts and feedback.

Jetpack Compose for Android is AMAZING, and I’m so excited for it to be stable and the recommended way to build Android applications. I’ve been working with the alpha versions of Compose 1.0.0 on Android for the last 6 months on side projects and have been doing a lot of thinking based on my experiences. One thing that came to mind when I first started, and still does, is how to structure my project and organize all my @Composable functions.

I’ve asked this question for #TheAndroidShow which is tomorrow, and hopefully will get some recommendations, but I’ve already had some good conversations on Twitter.

When I look around at the AndroidX Compose Library (Button.kt) and the compose-samples that the Google Developer Relations Team has published, I see that composables are organized by file.

Over the last 4 years of being a full-time Kotlin developer, I have tried to keep a single class or object per file. I also try to avoid writing code at the root level of a file.

The only exceptions I make when writing Kotlin code are for extension functions and typealiases, since those are required to be written directly in a file. I’m used to finding items by what class/object they are in, and not the function name. I’ve also historically found that large refactoring has been more successful when a file has a single Kotlin class or object.

For this post, I made up the GreetingHeader and GreetingContent @Composables for the purpose of having an example of related @Composables.

Let’s take a look at some options on how to group related @Composable functions.

Root Level in a File

@Composable
fun GreetingHeader() {
    Text(
        text = "Hello",
        style = MaterialTheme.typography.h1
    )
}

@Composable
fun GreetingContent() {
    Box(contentAlignment = Alignment.Center) {
        Text(
            text = "How are you?",
            modifier = Modifier.padding(16.dp)
        )
    }
}

Top level functions for nice clean syntax, but how do you find these composables in a project you are unfamiliar with? Composables don’t extend other classes or implement interfaces, so it’s hard to use built in tools to Android Studio and Intellij to find related ones.

In an object

object Greetings {
    @Composable
    fun GreetingHeader() {
        Text(
            text = "Hello",
            style = MaterialTheme.typography.h1
        )
    }

    @Composable
    fun GreetingContent() {
        Box(contentAlignment = Alignment.Center) {
            Text(
                text = "How are you?",
                modifier = Modifier.padding(16.dp)
            )
        }
    }
}

I originally leaned on this so I could search for a @Composable, and use auto complete. I do like it, but I don’t like the longer composable names, even though I can do static imports.

In a class

class Greetings {
    @Composable
    fun GreetingHeader() {
        Text(
            text = "Hello",
            style = MaterialTheme.typography.h1
        )
    }

    @Composable
    fun GreetingContent() {
        Box(contentAlignment = Alignment.Center) {
            Text(
                text = "How are you?",
                modifier = Modifier.padding(16.dp)
            )
        }
    }
}

I haven’t tried this yet. It could work though (it compiled), especially if you want to be able to access injected dependencies, etc.

In a class or object, via an interface

interface HeaderAndContent {
    @Composable
    fun Header()

    @Composable
    fun Content()
}

object Greetings : HeaderAndContent {
    @Composable
    override fun Header() {
        Text(
            text = "Hello",
            style = MaterialTheme.typography.h1
        )
    }

    @Composable
    override fun Content() {
        Box(contentAlignment = Alignment.Center) {
            Text(
                text = "How are you?",
                modifier = Modifier.padding(16.dp)
            )
        }
    }
}

I haven’t used an interface yet, but it’s an interesting thought. I checked it out and it’s possible and compiles. It could help with discoverability for similar @Composables.

This also gets me thinking about capitalization of @Composables. It isn’t required from a compiler standpoint, so what if we did this.

interface HeaderAndContent {
    @Composable
    fun header()

    @Composable
    fun content()
}

object Greetings : HeaderAndContent {
    @Composable
    override fun header() {
        Text(
            text = "Hello",
            style = MaterialTheme.typography.h1
        )
    }

    @Composable
    override fun content() {
        Box(contentAlignment = Alignment.Center) {
            Text(
                text = "How are you?",
                modifier = Modifier.padding(16.dp)
            )
        }
    }
}

Conclusion

It is very early on, and I’m not sure what the best way will be to organize @Composable functions. I typically say to do what the community is doing, but at this point we just have what the Google team is doing really. Let’s all use Compose some more, and figure out what works the best, but keep an open mind and try new things. Feel free to reach out with what you’re trying on Mastodon.

Unlocking Biometric Prompt – Fingerprint & Face Unlock

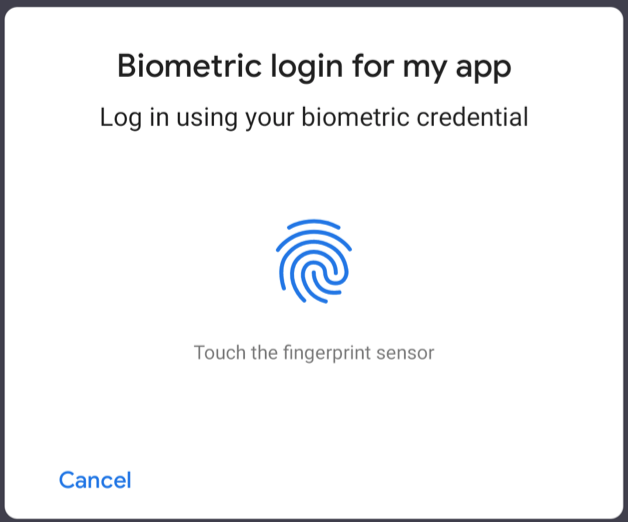
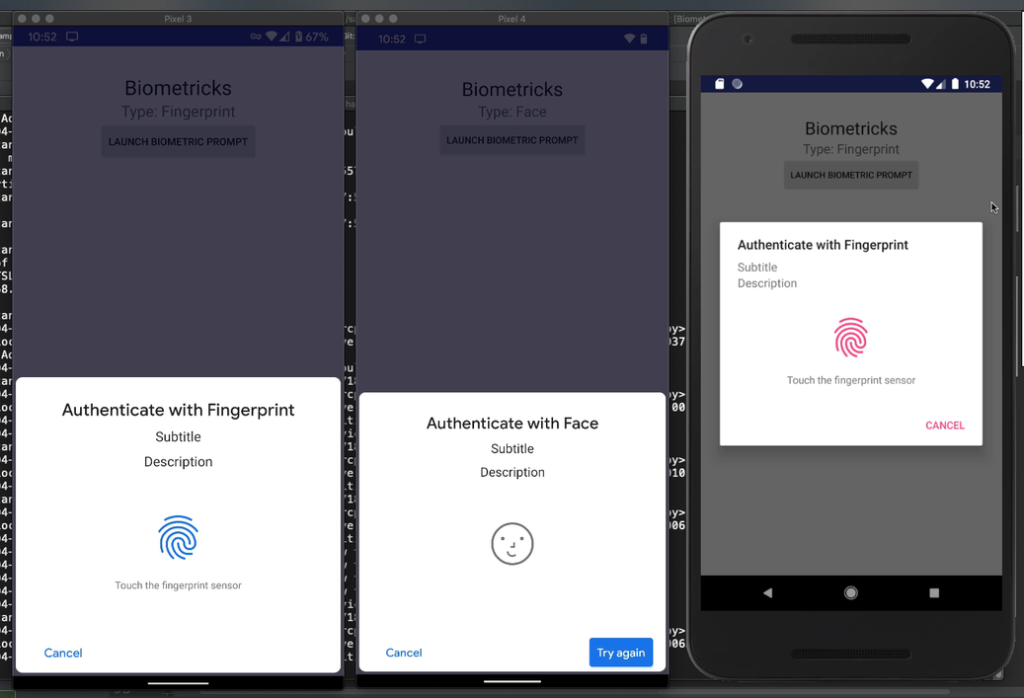
AndroidX Biometric gives us a single API for supporting Biometrics on Android devices via the BiometricPrompt, and a fallback Fingerprint dialog for API 23-27.  This post does a side-by-side comparison of what it looks like on the Pixel 4, Pixel 3, and an API 26 Emulator to show you what it looks like on different devices, hardware and different builder configurations.

Currently, the Pixel 4 is the only device that supports Face Unlock via the Biometric Prompt. There aren’t even emulators that support it.  I ended up with a Pixel 4, and wanted to create this post with you to save you some 💰 and⌚.

What is the Android Biometric Prompt?

The Android Biometric Prompt was released as part of the Android OS in API 28 (Pie) to replace the FingerprintManager.  Its goal is to make a standard way of interacting with Biometrics via the operating system, and also support multiple types of biometric types such as Fingerprint, Face & TBD.

One of the downsides of the Biometric Prompt is that we are asked to use the terminology “Biometric” instead of “Fingerprint” or “Face” because the BiometricManager doesn’t tell us the type of biometric the user will use.  Read more about how to provide better user experiences through tailored biometric messaging in my previous post.

Using AndroidX Biometric

I’m going to show you various configurations of the library in this post, but refer the documentation from Google for more information.

BiometricPrompt.PromptInfo.Builder()
 .setTitle("Authenticate with Face")
 .setNegativeButtonText("Cancel") 
 .setConfirmationRequired(true)
 .build()
Face Unlock Success

Face Unlock Fail & Retry

Confirmation Required

There is a configuration parameter for Biometric Prompt Info Builder called “setConfirmationRequired” which, when set to false, passively authenticates the user without any interaction (other than looking at the phone). Note: This only works for Face Unlock since a Fingerprint is confirmation.

.setConfirmationRequired(false)

.setConfirmationRequired(true)

NOTE: There is a setting which allows a user to ALWAYS confirm when using Face Unlock, so be aware of that when building your applications.

Conclusion

Use AndroidX Biometric.  It feels like they were still working out the kinks when they release Biometric Prompt in API 28.  The AndroidX Library has some device specific workarounds and the fallback dialog for API 23-27.  It’s weird that there isn’t better documentation about the user experience for each biometric type, which is why I wrote this post. Hopefully you won’t have to spend hundreds of dollars on a Pixel 4 now, and have a better idea of what the Biometric Prompt looks like under different configurations.

Links:

Companion Video on AsyncAndroid

Android Device Mirroring and Recording

Mirroring and Recording what is on your physical Android Device to your computer isn’t trivial, but is an important skill to have as a developer. Being able to share and record what you see on your Android screen is super helpful for live demos, your GitHub PRs, and blog posts. There are a lot of ways to do this, but there is no perfect way of doing it.  I’ll walk you through my flow in this post.

I used Vysor for a long time, and think it’s a great tool to use to mirror your device onto your computer.  Vysor is really easy to use, but the free version does have feature limitations such as mirroring quality, and advertisements every 15 minutes. When I tried scrcpy with my development setup, I found that for me it worked the best out of any of the other tools to do this.

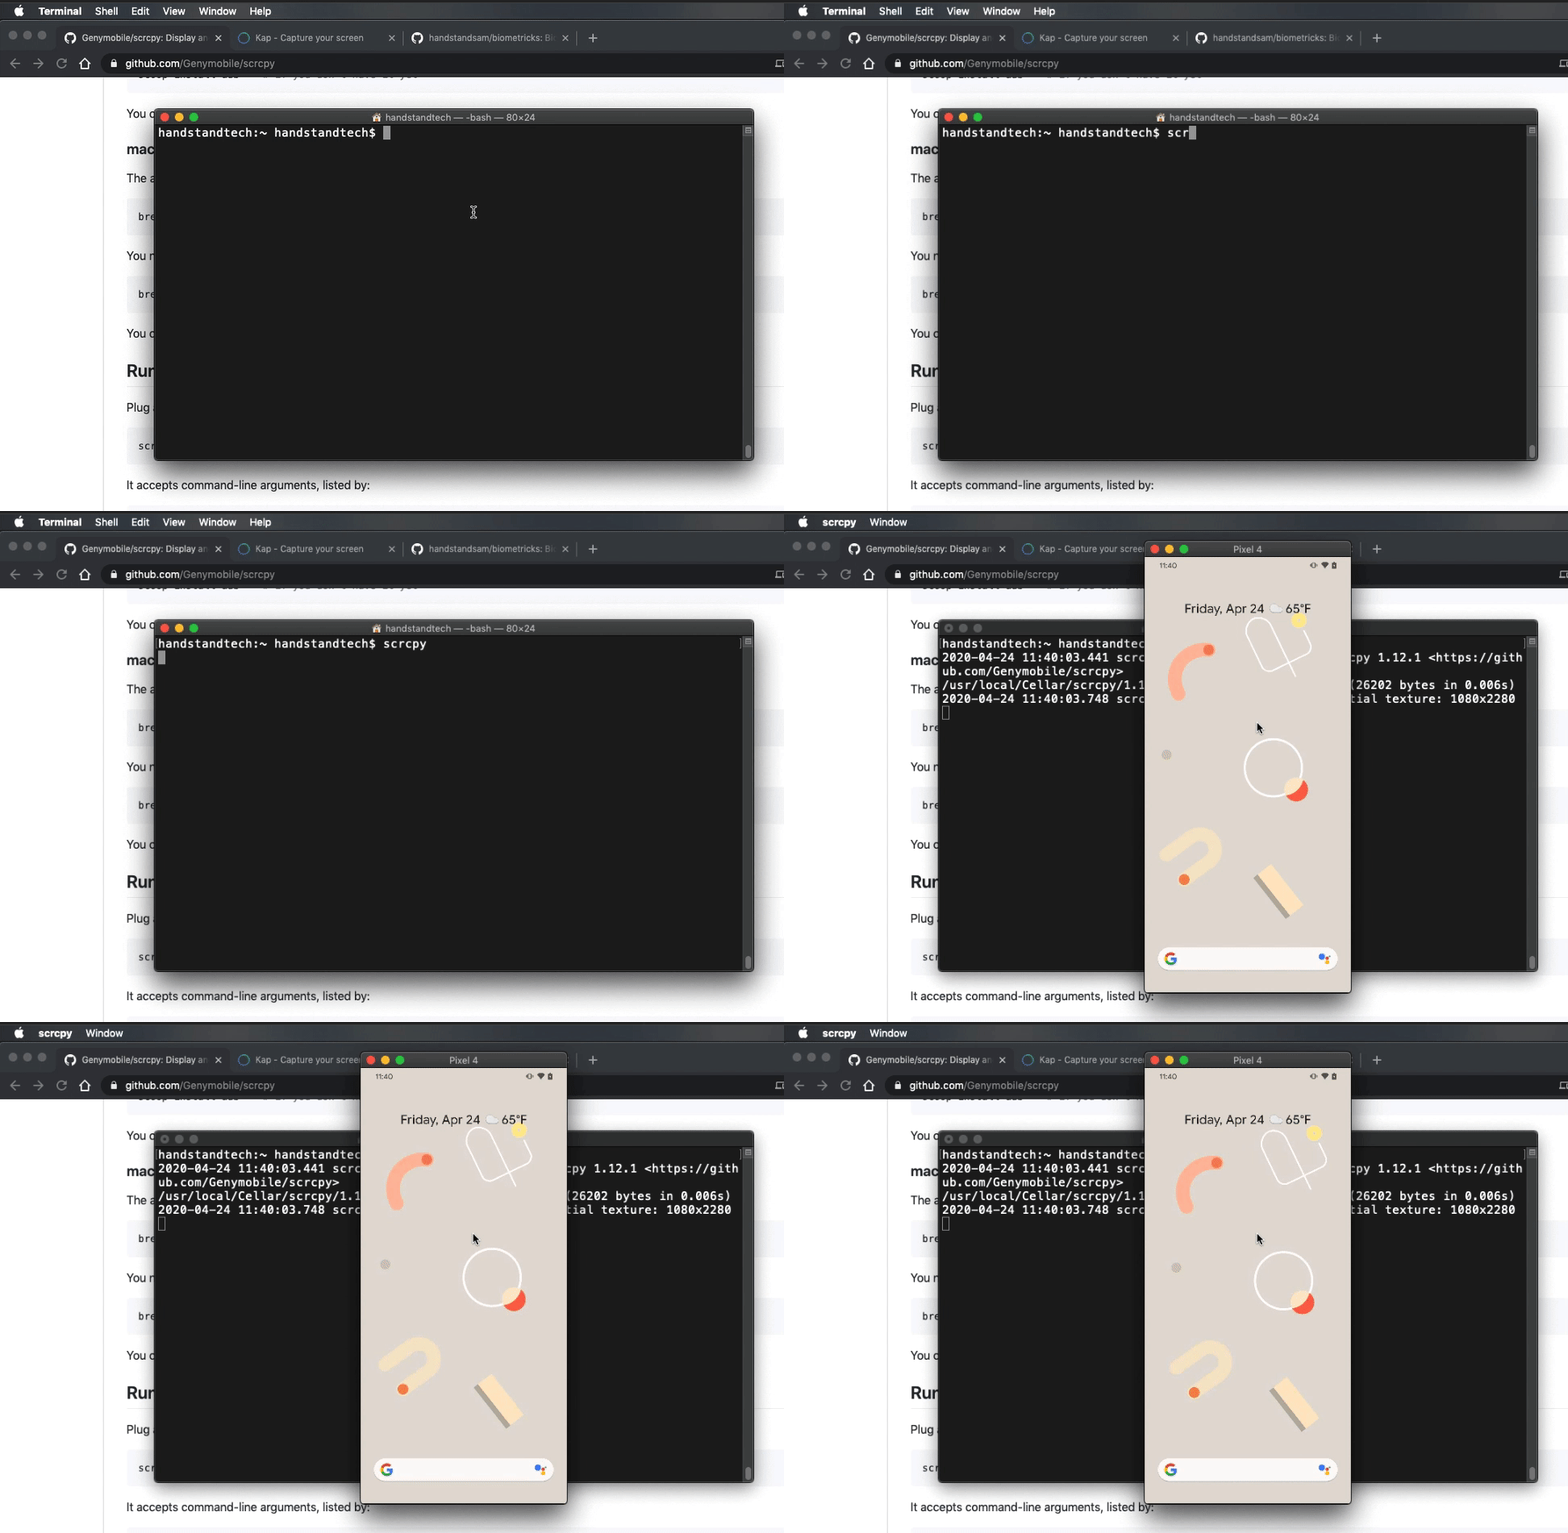
See the scrcpy GitHub page for all the instructions, but if you are on a Mac, already have “adb” configured, and have homebrew, then just run brew install scrcpy.  After it’s installed you can just type “scrcpy” into your terminal and it’ll launch device mirroring.

Now that you have your Android device mirroring on your computer, you need to record it.  There are a lot of tools that allow you to screen record into a GIF, but I use Kap.  You can launch Kap via the menu bar with this icon:

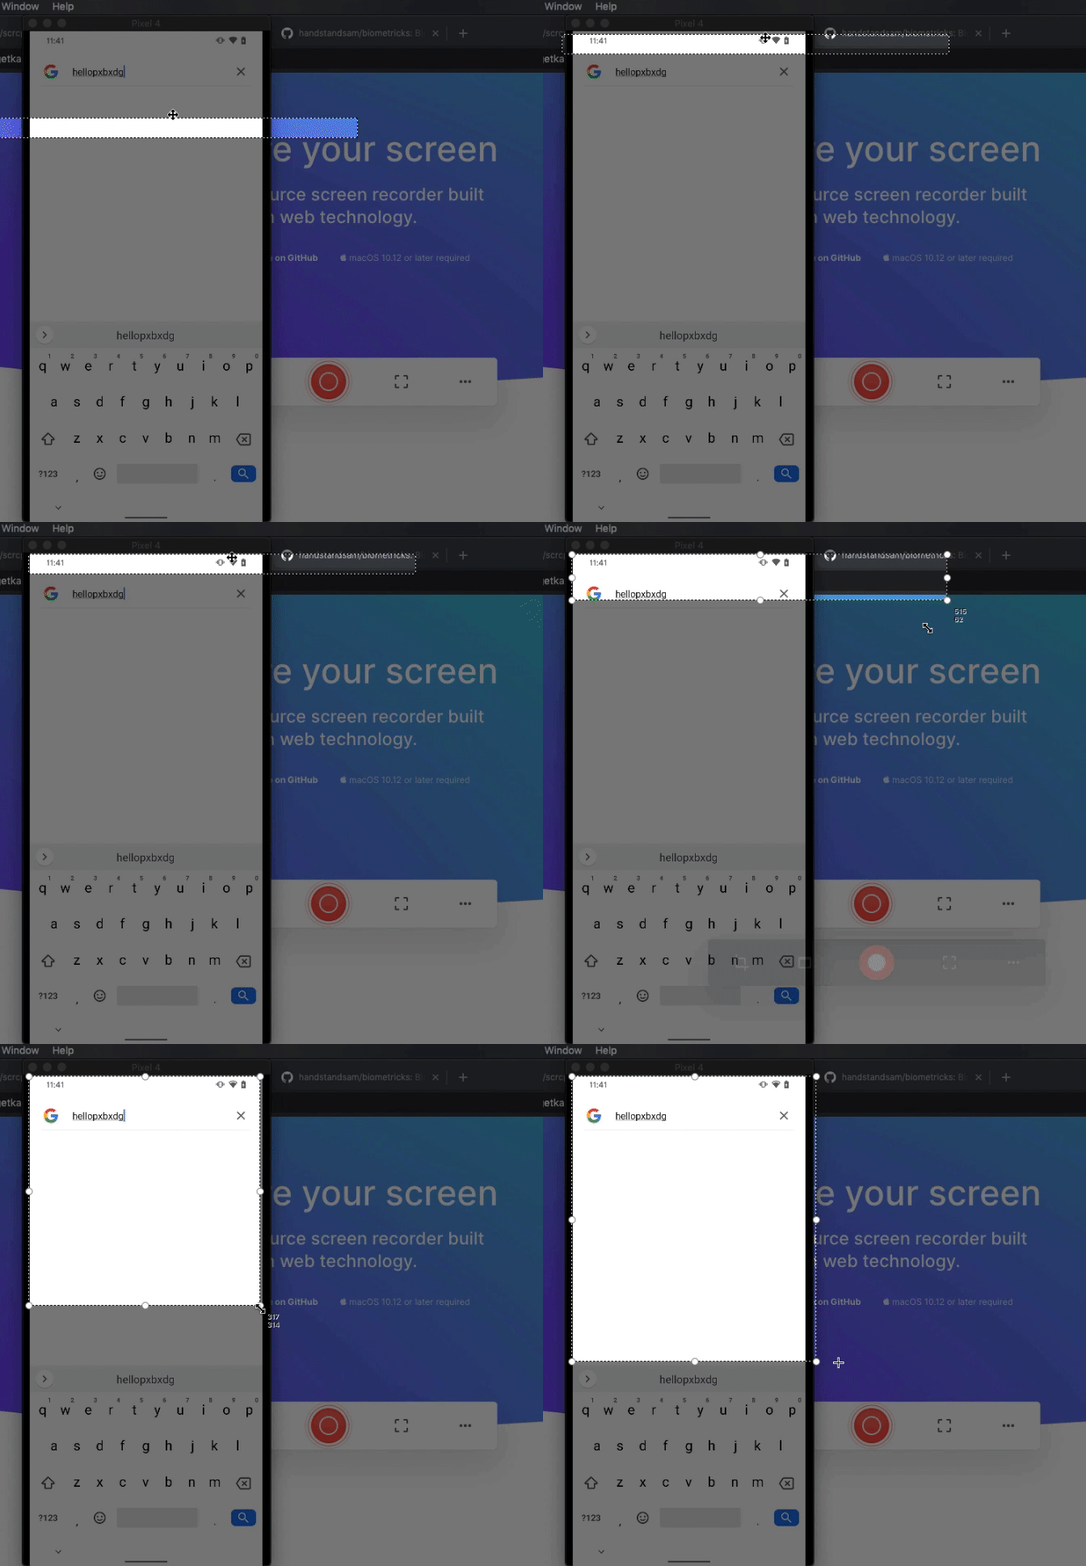
Then select an area of your screen manually,

… or choose an open application window.

After you are done recording, stop the recording with the button in the menu bar.

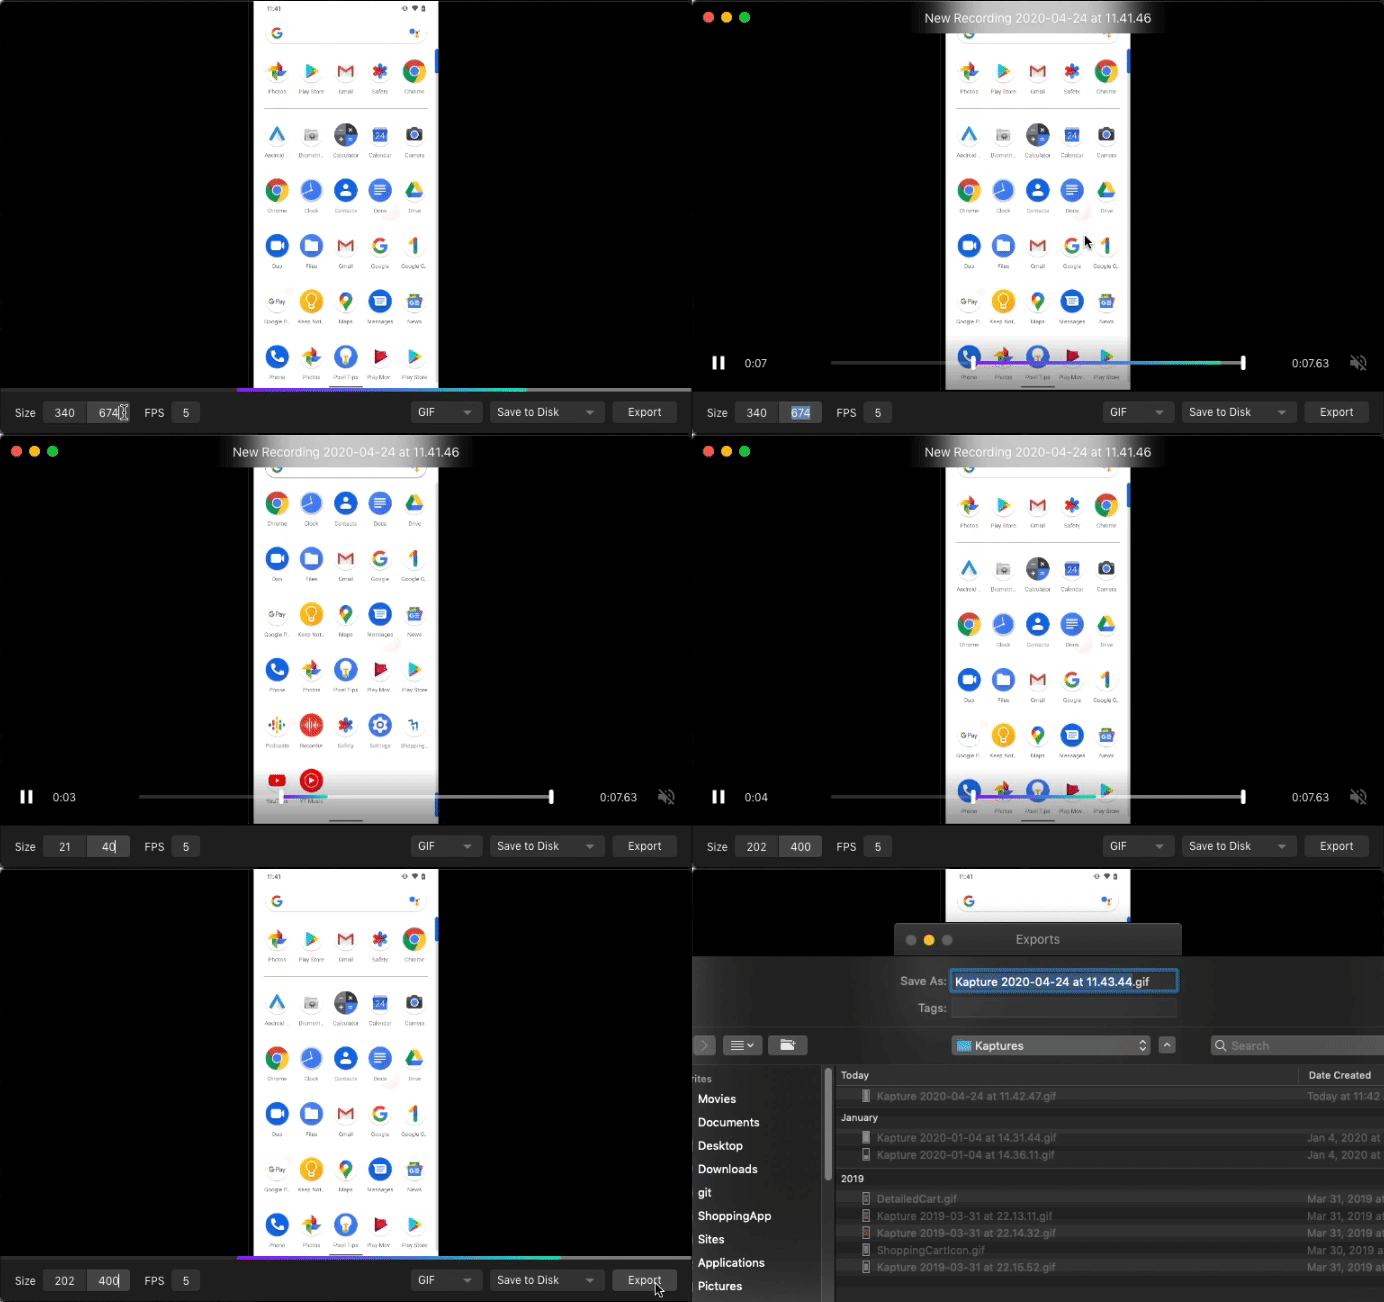
Trim your content, select resolution, frames per second (FPS), export format (GIF, MP4), and export!

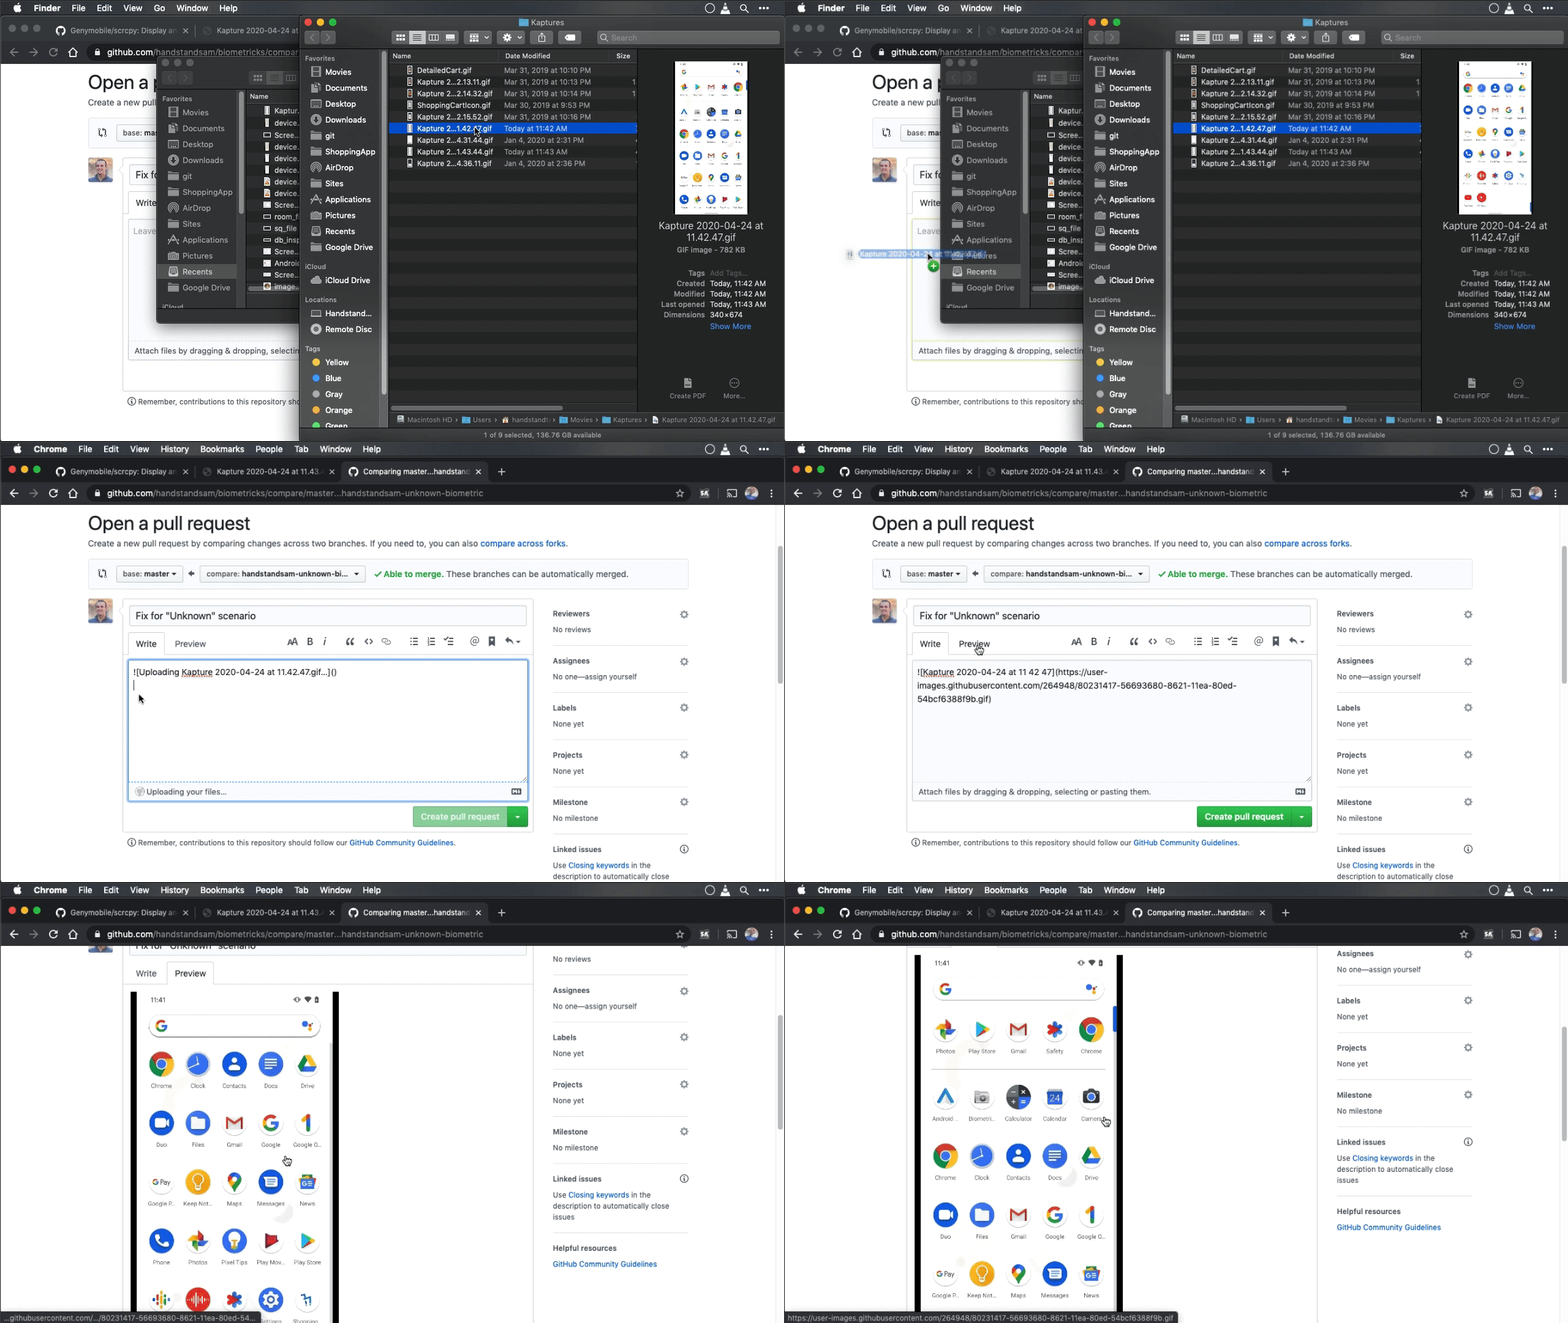
Drag and drop the file into your GitHub PR.  NOTE: 10MB is the limit for image attachments in a PR, so adjust your frames per second and image resolution to find the right size.

Your PR has a GIF of your device! 🎉 This makes your PR a lot easier to understand to a reviewer, and anyone looking back at this PR in the future.

Conclusion

Adding GIFs to PRs and blog posts really keep readers engaged.  It especially did if you are actually reading this far 😎.  I hope my you find my recommendations something that help your Android development and content creation!

Links:

Companion Video on AsyncAndroid

Android Biometrics UX Guide – User Messaging

Users Say: “Biometric…🤷‍♂️🤷‍♀️?”

When I’ve demoed “Biometric” UIs to non-developers, many say:

Why don’t you just say “Fingerprint” or “Face Unlock”?

The reason is that the Biometric APIs have no way to find the type of biometric that will be used.  That’s why we are stuck with using “Biometric” as a catch all.  You can see the terminology being used in Google’s Android Developer Training on Biometric Auth.

We’re also working with the UX / design team on clear iconography/messaging – in the meantime, our suggestion to developers has been to use something along the lines of “Biometric settings”, or “Use biometric”, etc.
– Googler’s Response on Issue Tracker

I have read “BiometricManager” and “BiometricPrompt” enough times to get used to it, but users haven’t.  So let’s see what we can do to create better user messaging.

Option A: Describe “What” Instead of “How”

Say what the user is going to do like “Unlock” or “Login” or “Confirm” or whatever.  Just don’t mention how the user will do it via a biometric.  The system will show the UX for the biometric type anyways in the Biometric Prompt, but your customized wording will be whatever you provide.


Consider these scenarios as well:

  • What will you call this on your settings page?
  • What iconography will you use for “Biometric” on a Pixel 4 with Face Unlock? A Fingerprint?  That’s not ideal.
  • How will you encourage your users to use biometrics in your app?  Maybe you could say “Unlock Faster Next Time” and it can be implied that a biometric will be used?

You might be able to get away with this messaging, and if you can, congrats! 🎉

Option B: Write Code and Cross Your Fingers🤞

It’s possible to figure out what biometric will be used the majority of the time, and I’ll show you how. 😎

Running on Pixel 3 Running on Pixel 4

Step 1) See If Device Has Biometric Support

Ask the BiometricManager if it canAuthenticate(), and if it’s successful, or says the user has not enrolled their biometrics, then you know the device is capable.

val biometricManager = BiometricManager.from(context)
val isCapable = when (biometricManager.canAuthenticate()) {
    BiometricManager.BIOMETRIC_SUCCESS,
    BiometricManager.BIOMETRIC_ERROR_NONE_ENROLLED -> true
    else -> false
}

The result of this just tells us that the device is capable of using the BiometricPrompt.

Step 2) Ask PackageManager For Available Features

There are currently only 3 types of Biometrics as of API 29 (Android 10).  The Android PackageManager can be queried to see if these features are available on the device.

// Get Package Manager
val packageManager : PackageManager = context.packageManager

Based on these, you should know, but there are edge cases:

  • One is available – If only one is available and the rest are not, you should feel pretty confident that you know the exact type of biometric that will be used.
  • More than one available – It is possible that a device could have more than one biometric feature.  It could have Face Unlock and Fingerprint.  Android is an open platform, and Google has said that OEMs could do this if they choose.
  • None are available –  If this is the case, and the BiometricManager said you canAuthenticate(), then some sort of biometric is available that we have never seen before.  This could be the case if this code is run on a future version of Android with a Biometric type we don’t know about.

Step 3) Determine Supported Biometrics

Based on all the logic above, we will end up with one of the following results.

sealed class Biometrics {
    object None : Biometrics()
    sealed class Available : Biometrics() {
        object Face : Available()
        object Fingerprint : Available()
        object Iris : Available()
        object Multiple : Available()
        object Unknown : Available()
    }
}

You can then use a “when” statement to create user messaging for a specific biometric hardware type. 🎉

What are future Biometric Types?

We don’t know yet.

Biometric APIs are meant to be more future-looking. We “could” expose something like authenticate(type, info, crypto) etc, but it exposes more API surface and thus has the chance of causing more fragmentation across OEMs.
– Googler’s Response on Issue Tracker

In order to be more open ended, these Biometric APIs are built in a way where generic messaging is the recommended approach currently.

Conflicts with Material Design Guidelines

The Material Design guide for Fingerprint explicitly says to maintain consistency with Android Settings. Such as “Confirm fingerprint”.  The BiometricManager tells us if a user “canAuthenticate()“, but doesn’t tell us what types of Biometrics are available on the device or which one (if more than one) is currently enabled.  The rationale for this:

If new sensors are developed, we would need to keep updating the “type” list, and apps would also need to keep updating to use the new types. Perhaps there’s a way to make that work, just we haven’t spent much time investigating.
– Googler’s Response on Issue Tracker

I think this is a great way to do it, and aligns with user expectations, but this is not available with current Biometric APIs. 😞

Pixel 3 Settings Pixel 4 Settings

Conclusion

This all sounds like a lot of work.  You can just use “Biometric” and you’ll probably be fine.  Users will get used to it eventually, right?  No matter how hard we try at this point, we will end up having to use that terminology in the cases where “Multiple” or “Unknown” biometric features are available anyways.

It kinda stinks that we got forced to use these APIs since FingerprintManager is deprecated, and the Biometric APIs have a lot of these little workarounds you may need to do.  I understand the rationale behind it from an OS standpoint, but I hope that Google exposes the type(s) of Biometric available on the device to use.  That way we are sure, and aren’t doing all this work to try and figure it out.

Recommendations

  1. Must: Use the AndroidX Library.  It’s a wrapper on top of the Android OS APIs and deals with specific workarounds, as well as provides a FingerprintManager fallback for devices prior to API 28 which don’t have a BiometricPrompt in the OS.
  2. Recommended: Checkout Biometricks which is a library in development to do what is mentioned in this article.  It has a sample app and more.
  3. Recommended: Do some user testing.  I’m giving some advice from what I’ve seen, but you may find something different with your users.  Your users are your source of truth.

Disclaimers

  • This is a UX guide, and not anything related to security of using Biometric features of Android.
  • These are my personal observations and opinions.

Related Links

SQLDelight 1.x Quick Start Guide for Android

SQLDelight is most well known as a Kotlin multiplatform database library. As an Android Developer, the most compelling reasons to use SQLDelight are:

  • Kotlin first
  • SQL first
  • Typesafe generated code
  • Unit tests don’t require an Android device

Documentation for how to use SQLDelight on just Android (without Kotlin mutliplatform) is lacking, so I wanted to create this guide to get people going fast on just Android.  This example is here to get you started, but does not reflect best coding practices.  I did this in order to make this quick start guide concise, and approachable.

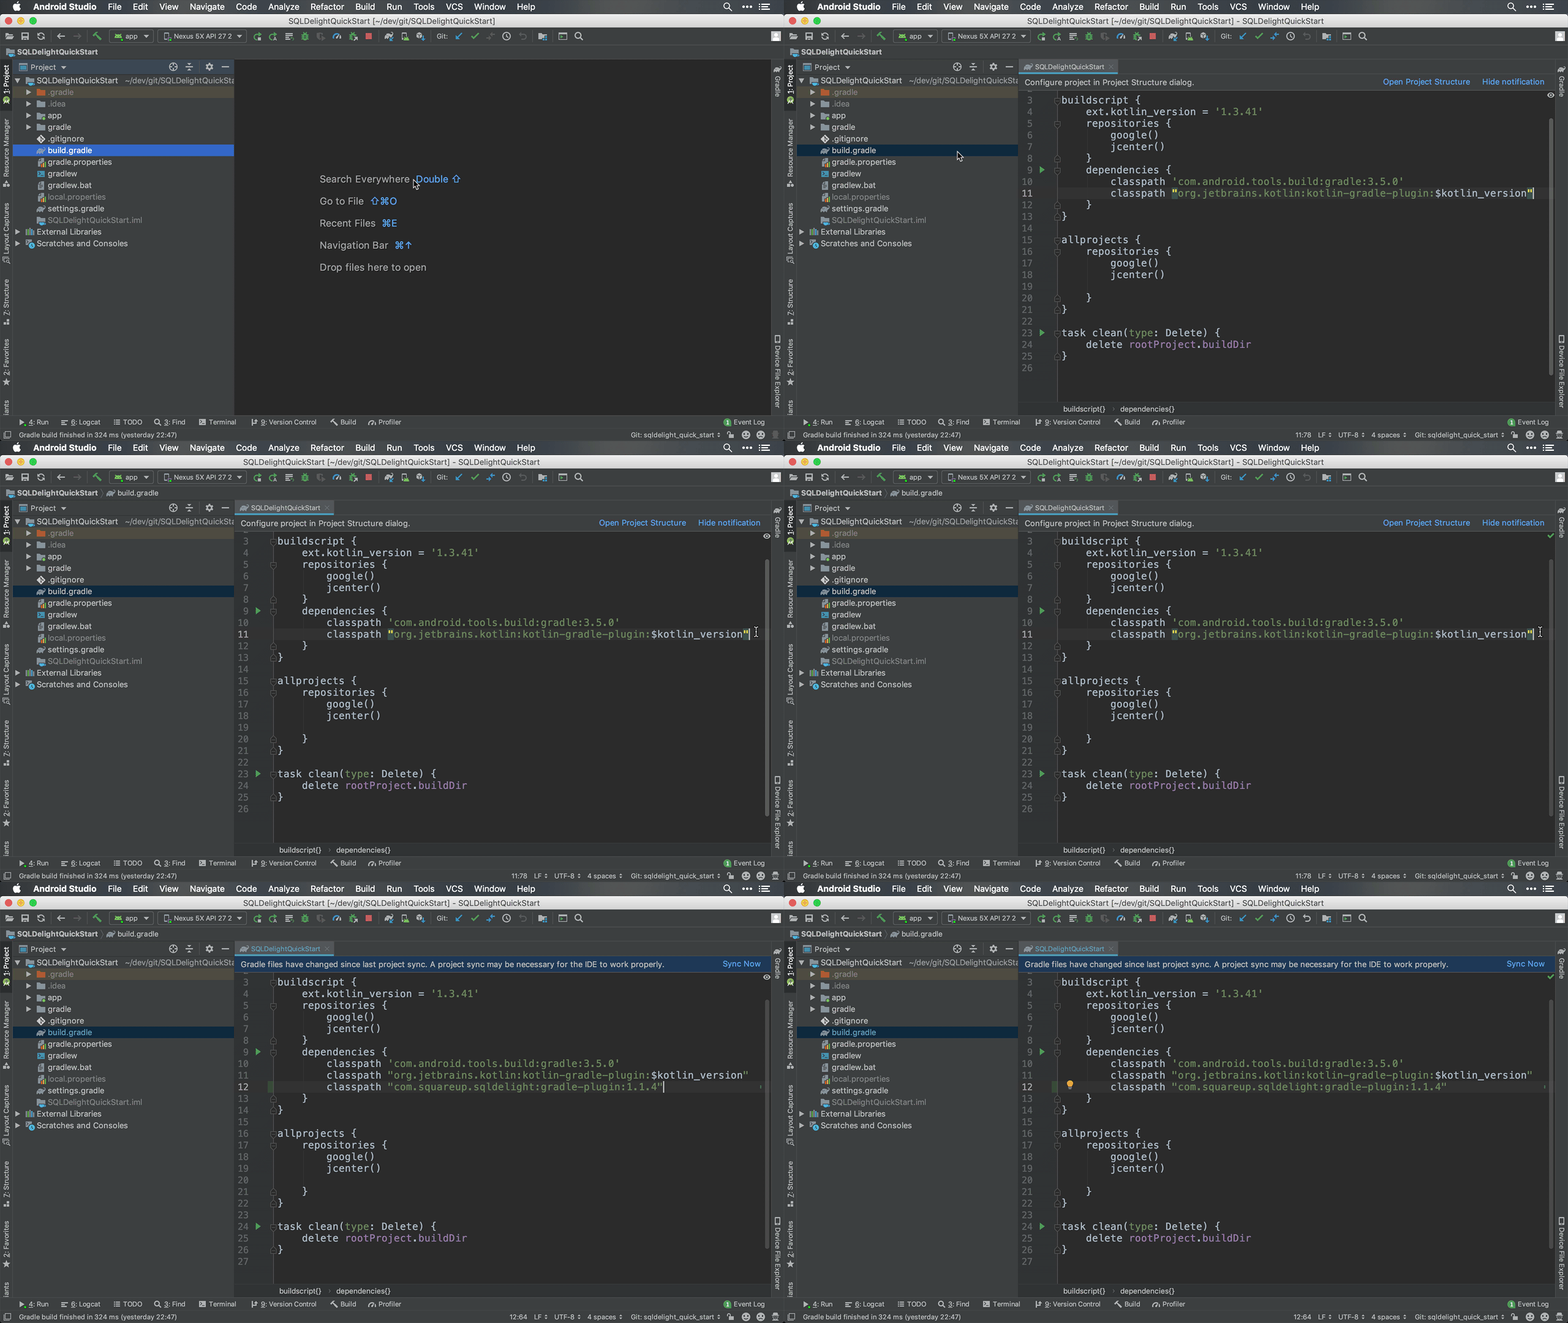
1) Add Gradle Plugin to the buildscript classpath

In your project’s root build.gradle file, add the following dependency under buildscript dependencies.

classpath "com.squareup.sqldelight:gradle-plugin:1.3.0"

2) Apply the Gradle Plugin to your App or Module

You need to add the SQLDelight Gradle Plugin to your app or module because SQLDelight uses code generation from SQL files (*.sq), instead of code generation based on annotations (kapt).  This gives us incremental builds, but requires us to add a plugin to our root build.gradle file.  By doing code generation from SQL files, SQLDelight can generate code that works on any platform, because at the end of the day you are just executing SQL statements.

apply plugin: "com.squareup.sqldelight"

3) Add/Write the SQL (.SQ) File

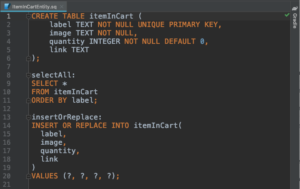
You need to create a source folder for your SQL (*.sq) files at “src/main/sqldelight” folder, next to “java” or “kotlin” source folder. In this example, we’ll be representing a “item” in a shopping cart (Example from Shopping App) and the ItemInCartEntity.sq file in the following location:

MODULE_OR_APP/src/main/sqldelight/com/handstandsam/sqldelightquickstart/ItemInCartEntity.sq

ItemInCartEntity.sq

CREATE TABLE itemInCart (
    label TEXT NOT NULL UNIQUE PRIMARY KEY,
    image TEXT NOT NULL,
    quantity INTEGER NOT NULL DEFAULT 0,
    link TEXT
);

selectAll:
SELECT *
FROM itemInCart
ORDER BY label;

insertOrReplace:
INSERT OR REPLACE INTO itemInCart(
  label,
  image,
  quantity,
  link
)
VALUES (?, ?, ?, ?);

selectByLabel:
SELECT *
FROM itemInCart
WHERE label = ?;

empty:
DELETE FROM itemInCart;

deleteByLabel:
DELETE
FROM itemInCart
WHERE label = ?;

4) Install the SQLDelight Android Studio Plugin

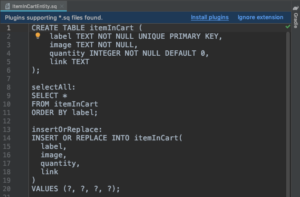
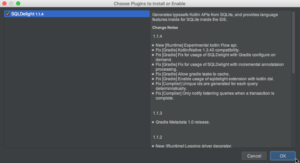
The Android Studio Plugin is not required, but is super helpful for syntax highlighting, code completion, warnings and navigation.

.sq file without the SQLDelight Android Studio Plugin

Adding the SQLDelight Android Studio Plugin

A .sq file after the SQLDelight Android Studio Plugin is Installed

5) Add the Dependency Used for in Memory Unit Tests

You need the JdbcSqliteDriver for Unit Tests. This allows you to run your database tests without Android device. This means blazing fast tests without the hassle of connecting a device!

Add the following Unit Test dependency:

testImplementation "com.squareup.sqldelight:sqlite-driver:1.3.0"

Note: You don’t have to write unit tests and could technically skip this and the next step, but do yourself the favor and write tests from the beginning.

6) Write Unit Tests

Now that everything is set up, you should write a unit test that runs on your computer to make sure it’s all working.  This is a huge benefit over the Room library that comes with Android Jetpack because we can completely decouple ourselves from knowing what Android is.  This allows us to verify our setup and to have a quick feedback loop to ensure everything is working.

Use the JdbcSqliteDriver for an in memory version of your database for unit tests to avoid state between tests. However, be sure to also call Database.Schema.create(sqlDriver) or your in memory tests will not work. In order to make sure I call it, I use an “apply” to make sure I do it along with creating an instance of the driver.

private val inMemorySqlDriver = JdbcSqliteDriver(JdbcSqliteDriver.IN_MEMORY).apply {
    Database.Schema.create(this)
}

Here is the full ItemDatabaseTest.kt file containing the Unit Test.

package com.handstandsam.sqldelightquickstart

import com.squareup.sqldelight.sqlite.driver.JdbcSqliteDriver
import org.junit.Assert.assertEquals
import org.junit.Test

class ItemDatabaseTest {

    private val inMemorySqlDriver = JdbcSqliteDriver(JdbcSqliteDriver.IN_MEMORY).apply {
        Database.Schema.create(this)
    }

    private val queries = Database(inMemorySqlDriver).itemInCartEntityQueries

    @Test
    fun smokeTest() {
        val emptyItems: List = queries.selectAll().executeAsList()
        assertEquals(emptyItems.size, 0)

        queries.insertOrReplace(
            label = "Pineapple",
            image = "https://localhost/pineapple.png",
            quantity = 5,
            link = null
        )

        val items: List = queries.selectAll().executeAsList()
        assertEquals(items.size, 1)

        val pineappleItem = queries.selectByLabel("Pineapple").executeAsOneOrNull()
        assertEquals(pineappleItem?.image, "https://localhost/pineapple.png")
        assertEquals(pineappleItem?.quantity?.toInt(), 5)
    }
}

7) Add the SQLDelight Android Driver Dependency

Now that we have the plugin working and unit tests passing, we need to integrate with our Android app. Add this “implementation” AndroidSqliteDriver dependency on SQLDelight.

implementation "com.squareup.sqldelight:android-driver:1.3.0"

If you only have an “app” module, then add it to that, but if you are in a multi-module project, I would highly suggest creating a “db” module (or similar) for this code.

8) Write your SQLDelight Android Code

In order to just show this working on Android, I pasted the code into the MainActivity, which is not what you should do, but it helps you validate that it’s actually working on Android.

You will need to use the AndroidSqliteDriver in order for SQLDelight to correctly write to the Android database. The JdbcSqliteDriver was helpful for allowing us to do in-memory unit testing, but it only keeps the database in memory, and would never save between app launches.

val androidSqlDriver = AndroidSqliteDriver(
    schema = Database.Schema,
    context = applicationContext,
    name = "items.db"
)

val queries = Database(androidSqlDriver).itemInCartEntityQueries

val itemsBefore: List = queries.selectAll().executeAsList()
Log.d("ItemDatabase", "Items Before: $itemsBefore")

for (i in 1..3) {
    queries.insertOrReplace(
        label = "Item $i",
        image = "https://localhost/item$i.png",
        quantity = i.toLong(),
        link = null
    )
}

val itemsAfter: List = queries.selectAll().executeAsList()
Log.d("ItemDatabase", "Items After: $itemsAfter")

9) Run The Code on Android

Hit the run button and filter Logcat so you can see that you have successfully added and retrieved data from SqlDelight on Android!

10) Peek at the “Magically” Generated Code

It’s cool to see where the plugin puts the code it generates in “build/sqldelight” and it may help you understand how SQLDelight works. The generated code is super easy to read since it uses Kotlin Data Classes, and the SQL code is just taken almost directly from your .sq file that you already wrote, but wrapped in a type-safe way.

Conclusion

These steps are all you need to get started with SQLDelight 1.x on Android.  Here is a pull request that contains all the changes mentioned in this post: https://github.com/handstandsam/SQLDelightQuickStart/pull/1/files.  This article was written when version 1.1.4 was released, but has been updated to version 1.3.0.  Check out the SQLDelight change-log to see the latest released version.

Enjoy the beautiful generated Kotlin code which is generated from our .sq files, and enjoy validating your code via unit tests that can run without an Android device!

Related Links:

Sharing Gradle Configuration in Multi-Module Android Projects

Using multiple modules in our Android projects help us split apart our code into logical components.  They also can enable faster incremental builds, and more modular code.  One problem with multi-module projects is that there is a lot of verboseness of configuration.  This post shows you a method of sharing common configuration between your Android Library modules in order to cut down on boilerplate Gradle configuration.

I made this change in a PR in my ShoppingApp project on GitHub and ended up deleting a net 90 lines of code over 7 library modules.

apply from: “____.gradle”

You can add the contents of another Gradle file into your current one by using “apply from: ” and specifying the file whose content you want to add.

apply from: "$rootProject.projectDir/android-library.gradle"

$rootProject.projectDir

Modules can exist in different directory structures, so by leveraging the $rootProject.projectDir property, we specify paths based on the root project directory.

Original Library Module build.gradle

apply plugin: 'com.android.library'
apply plugin: 'kotlin-android'

android {
    compileSdkVersion Versions.compile_sdk

    defaultConfig {
        minSdkVersion Versions.min_sdk
        targetSdkVersion Versions.target_sdk
        versionCode 1
        versionName "1.0"

        testInstrumentationRunner "android.support.test.runner.AndroidJUnitRunner"
    }
}

dependencies {
    implementation project(Modules.models)
    implementation Libs.kotlin_std_lib
}

Resulting Library Module build.gradle

apply from: "$rootProject.projectDir/android-library.gradle"

dependencies {
    implementation project(Modules.models)
    implementation Libs.kotlin_std_lib
}

Shared Gradle File

apply plugin: 'com.android.library'
apply plugin: 'kotlin-android'

android {
    compileSdkVersion Versions.compile_sdk

    defaultConfig {
        minSdkVersion Versions.min_sdk
        targetSdkVersion Versions.target_sdk
        versionCode 1
        versionName "1.0"

        testInstrumentationRunner "android.support.test.runner.AndroidJUnitRunner"
    }
}

If You Do Something 3+ Times, Extract Out Functionality

Whenever it’s possible and makes sense, use common configuration to reduce boilerplate.  This same rule applies if you are writing code, or writing Android Gradle configuration.  This post shares an “easy win”, that you may be able to use to help better manage your multi-module project. There is so much more you can do to clean up your builds by leveraging buildSrc where you can write in Kotlin, Java or Groovy, but that’s for another post.

“It Depends” Is The Answer To Your Android Question

Android Questions:

  • Should I use Kotlin Multiplatform? “It Depends”
  • Should I use Kotlin Multiplatform for UI? “It Depends”
  • Should I use an Actor or StateFlow? “It Depends”
  • Should I use Mockito? “It Depends”
  • Should I put my Kotlin code in src/main/java? “It Depends”
  • Should I use Flutter? “It Depends”
  • Should I wrap a 3rd party library’s API? “It Depends”
  • Should I install the Android Q Beta? “It Depends”
  • Should I use Dagger? “It Depends”
  • Should I use Kotlin or Java? “It Depends”
  • Should I use React Native? “It Depends”
  • Should I use Dependency Injection? “It Depends”
  • Should I use OkHttp? “It Depends”
  • Should I use Multiple Activities or a Single Activity? “It Depends”
  • Should I upgrade to the latest Support Library? “It Depends”
  • Should I use a library that’s in Alpha? “It Depends”
  • Should I use Room or SqlDelight? “It Depends”
  • Should I write Espresso tests? “It Depends”
  • Should I bump my minSdk to 28? “It Depends”
  • Should I use MVP or MVVM or MVI or MVC? “It Depends”
  • Should I use RxJava or LiveData? “It Depends”
  • Should I learn Android or iOS? “It Depends”
  • Should I start a blog? “It Depends”
  • Should I start a side project? “It Depends”
  • … Insert Your Question Here  … “It Depends”

“It Depends” Is Technically Correct 💯% of the Time

While “It Depends” is technically correct since there is no absolute answer in software, it still doesn’t make it a good answer.  “Probably Should” is an answer well, but when you think about it, it’s still a variation of “It Depends”.

“It Depends” Is a Crappy Answer

Juhani brings up a great point about responsibility in his tweet above.  Opinions are great because they are shaped by experience.  As you gain experience, it’s important to share your opinions and discoveries because they will help provide insight and context into a topic.  That empowers the person searching for the answer to make a decision, because you can’t write software with “It Depends”, since it won’t compile. 😂

There Is No Perfect Answer

My goal of this post was to point out that there are tons of ways to do things, but based on your team, use case and target audience, there is no good 100% right answer for any topic.  I can strongly urge you to use Kotlin, but if you are building something that people are willing to pay millions of dollars from and they need Java, then Java is your right answer.  The important part is to keep listening to opinions and discoveries that are brought up, but know they are not a one-size-fits-all solution.

I’m happy to share my opinion and experiences with you on any topic if you reach out to me on Twitter @HandstandSam, and I’ll do my best not to answer with “It Depends”. 🙂

When You Should Use Null in Kotlin

I was recently reviewing code with a developer that is learning Kotlin and they were adamant that:

“You should never use null. Null is BAD.” 


Null has got a bad rap.  Yes, it’s to be avoided in most code, but in Kotlin, null is part of the type system and the compiler will tell you when you haven’t handled it appropriately.  However, just because it’s easy to identify null in Kotlin doesn’t mean we should use it everywhere.  There are perfectly appropriate safe uses of null in Kotlin.

Valid usages of null in Kotlin

1) When Representing “No Value”

 var user: User? = null

If you need a way to represent whether a value is initialized or whether it has no value, then null is appropriate in this case.

2) Consuming External Data Sources

If you need a way to represent whether a value is available or unavailable, then null is appropriate in this case as well.

Apps must consume external data sources that we don’t have full control over.  When operating in a non-hermetic environment, we run into cases where some data sources are not reliable and may provide null content.  Whether it is a REST API, or an Android System Service, representing data that may not be available as a nullable type is important because it allows us to create code paths to handle both cases.

Functional Purity

While it seems ideal to never have null in your code, it’s not always possible to avoid, and sometimes shouldn’t be avoided.

Using a Sealed Class to Avoid Using Null

sealed class UserWrapper {
  object UninitializedUser : UserWrapper()
  data class InitializedUser(val user: User): UserWrapper()
}

Creating a sealed class for the sole purpose of avoiding the use of null introduces unnecessary boilerplate code.

Don’t get me wrong, sealed classes are one of my favorite features of Kotlin though, and are great if you need to handle more scenarios than just initialized or uninitialized, but if that’s all you need, then using null is a valid approach.

Using a Nullable Field

val user : User?

Using a nullable field is much more concise in your definition than a sealed class.  It’s also more concise to use a ?. operator instead of an “if” or “when” statement to process your sealed class.

Offensive Programming

If you really want to, you can run around with a bunch of !! (double bangs) in your code.  However, you are living dangerously and your code will crash if the value is null.  This may be what you are looking for though if you are trying to follow practices of Offensive Programming.

//This will crash if the user is null
handleNonNullUser(user!!)

Defensive Programming has us cover all possible code paths just in case it might occur.  When you do have these extra code paths, provide some fallback logic or warning logs.

Ways of Handling Null

If you check once that the value is non-null, the Kotlin compiler is smart enough for you to write your code without providing any !!.  Then process the non-null val after it’s been checked once, to avoid multiple checks throughout my code. Here are some ways to do this:

Null Comparison 😐
if (user != null) {
  handleNonNullUser(user)
} else {
  Log.w(TAG, "user was null")
  handleNullUser(user)
}

This is very Java-esque, but it does the trick.

Let 🙂
user?.let {
  //Work with non-null user
  handleNonNullUser(user)
}

I like using let because it allows us to write much more idiomatic Kotlin.  It does not allow us to handle null, “else” case though.

Early Exit 👍
fun handleUser(user : User?) {
  user ?: return //exit the function if user is null
  //Now the compiler knows user is non-null
}

If the value is null, you can exit the method immediately, otherwise you can operate on the non-null value (because the Kotlin compiler is that smart).

Immutable Shadows 👥😲

Using immutable “variable shadows” a really cool way of providing null safety.  It will do an “Early Exit” if the value is null, otherwise it will assign the non-null value of the var to an immutable val allowing the compiler to know the value is non-null.  Thanks to Gabriel Peal for this tip!

var user : User? = null

fun handleUser() {
  val user = user ?: return //Return if null, otherwise create immutable shadow
  //Work with a local, non-null variable named user
}

Conclusion

There is no doubt that you will write better code if you try and stick with non-null and vals where you can. However, if you run into a scenario where using null is the right thing to do, then don’t fight it.

Code appropriately using one of the techniques I’ve shared in this article to handle null effectively.  These techniques allow you to avoid having to use the !! operator which can lead to NullPointerExceptions.  The whole point of having a nullable type in Kotlin is to allow you to avoid NullPointerExceptions at compile time, instead of them sneaking up on your at run time.

You may be thinking that this post is similar to Roman Elizarov’s post “Null is your friend, not a mistake“, and you would be right.  His post inspired me to finally publish this, and you can read more of the story behind publishing this post here.