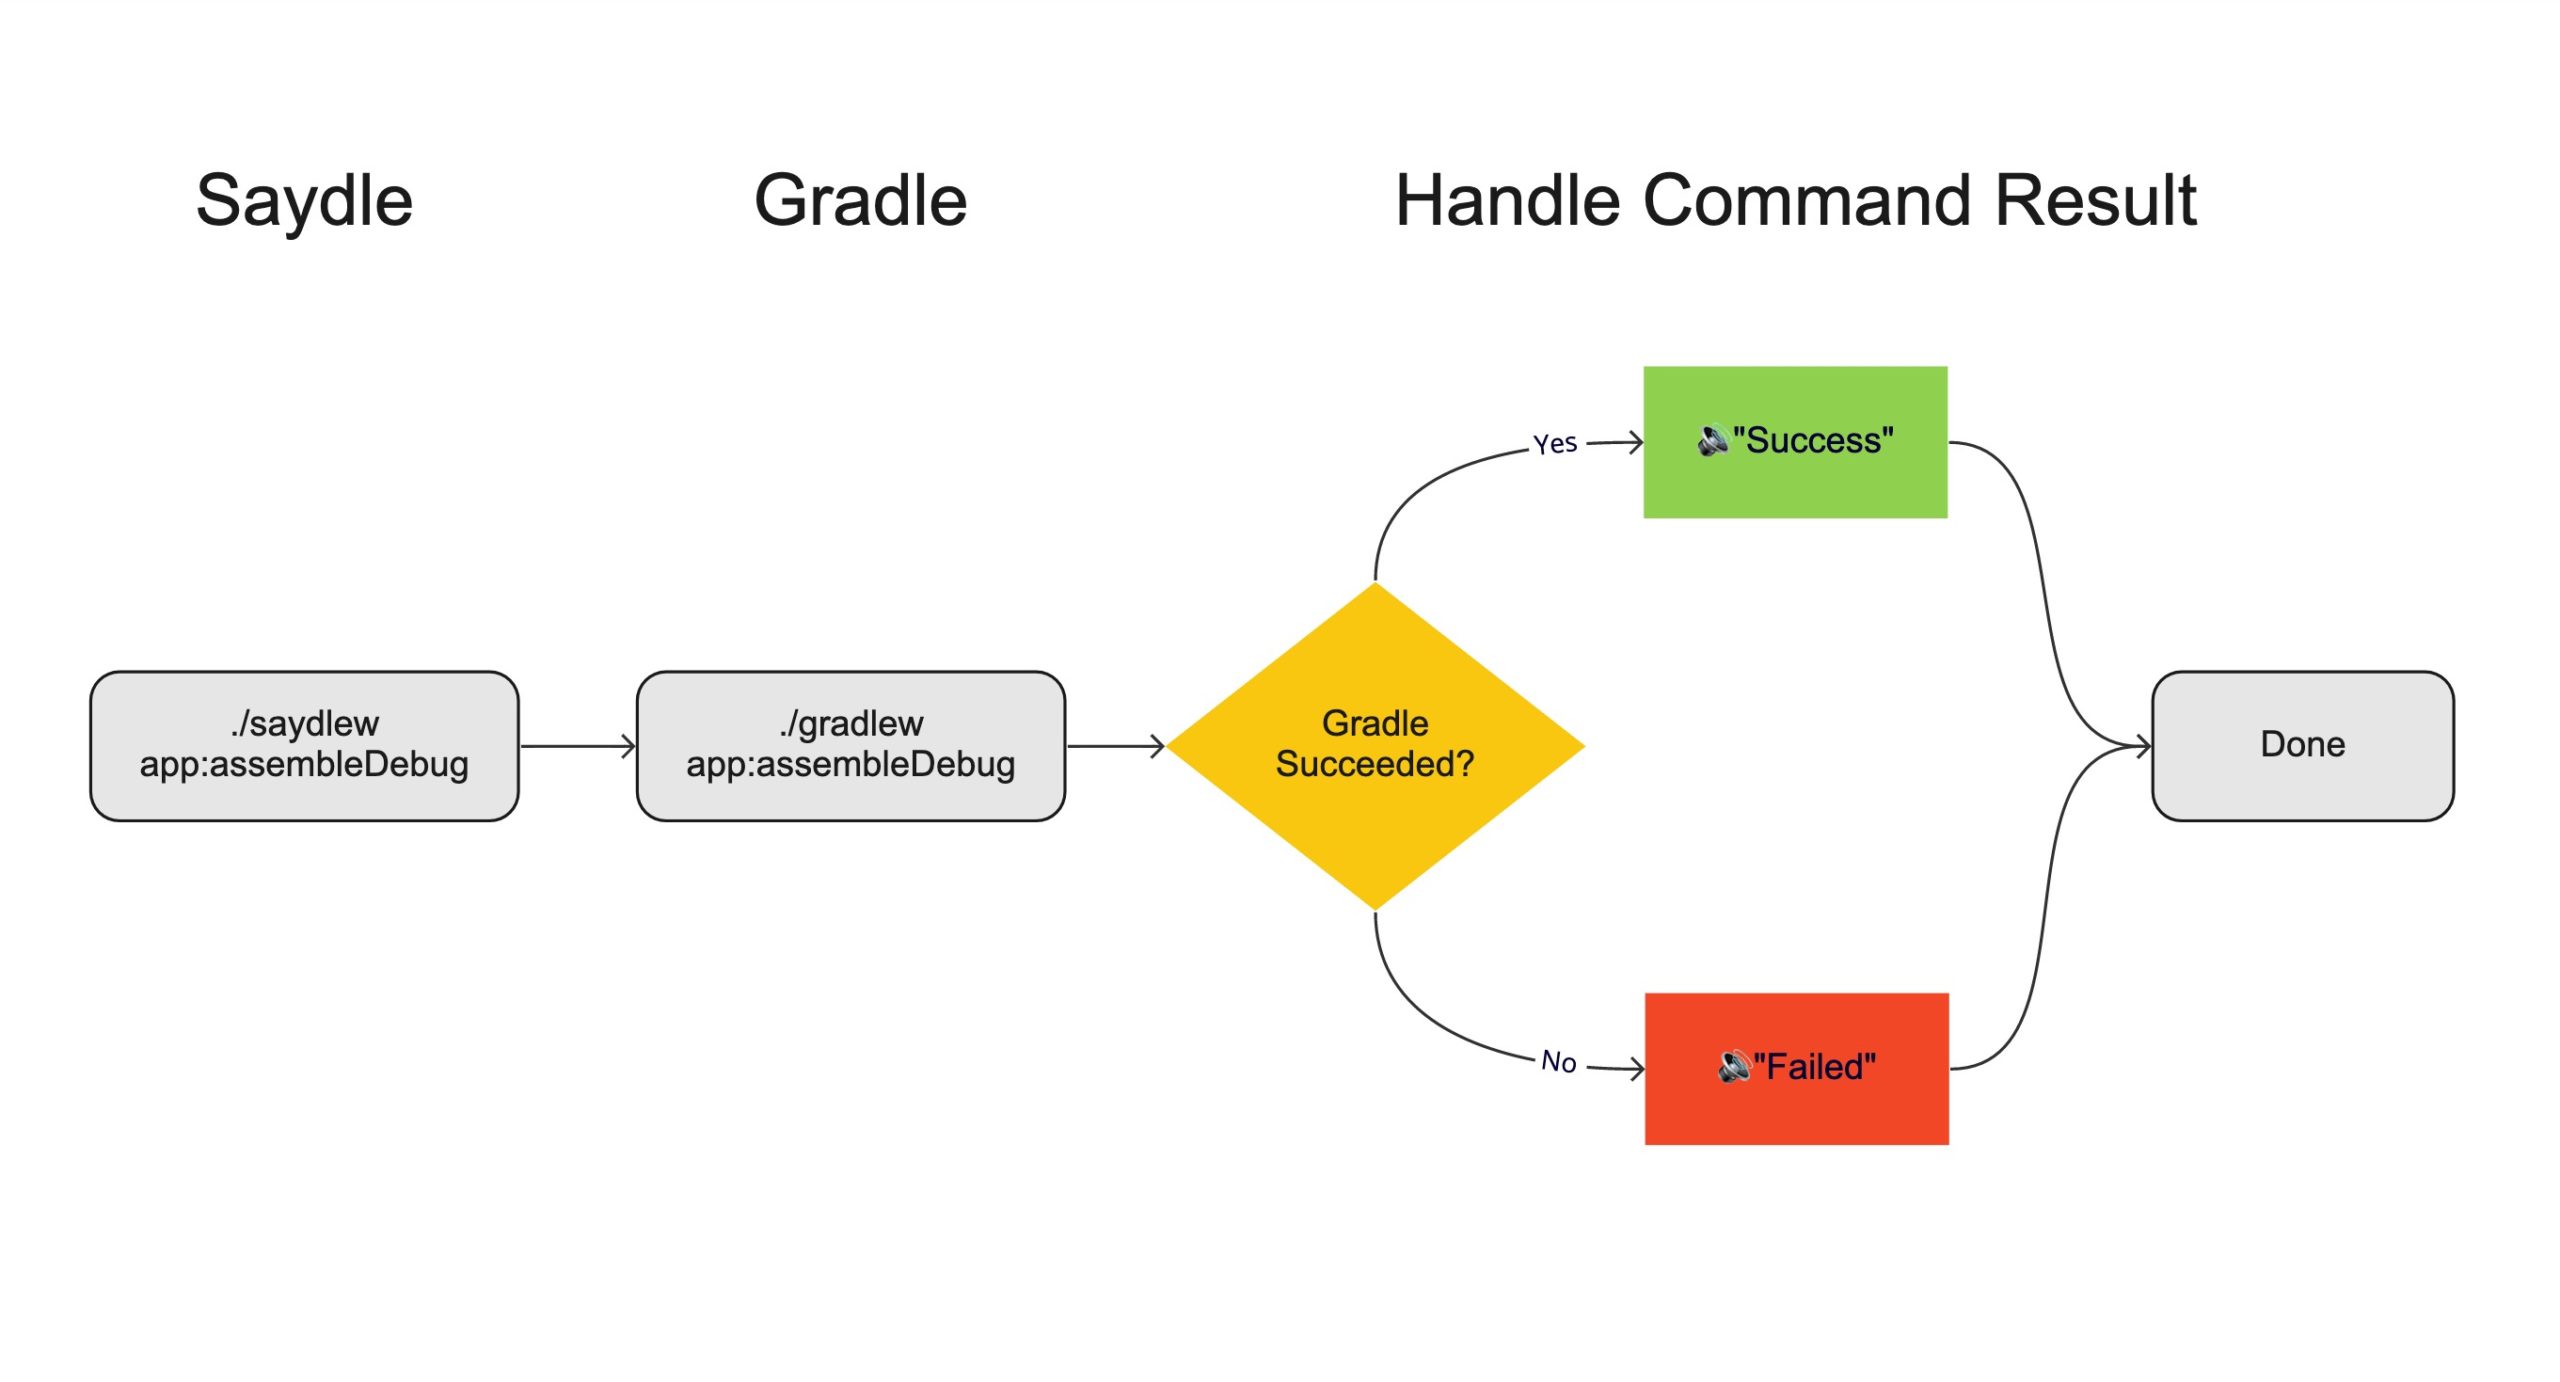
Report of your Android App’s Permissions

Permission Awareness

Knowing what you ship to your users is key, and permissions are one part of it. If you just look at your src/main/AndroidManifest.xml file, and think that’s all the permissions you will be shipping to the Play Store, you may find your self surprised that it may not be true. Applications can declare permissions, but 3rd party libraries and modules can declare them as well. Only the final, AndroidManifest.xml that has been generated via the manifest merging process is the source of truth.

In this article I share how the merged manifest is created, where you can find it, and a small Python script I created to parse the file and print out a list of permissions.

What is the “manifest merge” process?

There is a “manifest merge” process which takes all libraries and modules that your application relies on which ends up generating the final AndroidManifest.xml file. Merging the manifest is important because dependencies you rely on can bring in extra permissions you don’t define in your application yourself.

Where do I get my merged AndroidManifest.xml file?

Option 1: Grab the merged manifest from the build directory.

  • Build your APK via Android Studio or the command line.
    • Example ./gradlew app:assembleRelease
  • Locate your merged AndroidManifest.xml in the build directory: app/build/intermediates/merged_manifests/release/AndroidManifest.xml

Option 2: (You only have the APK, but didn’t build it yourself)

  • Copy/paste the APK you have into Android Studio. Then open it, and view the AndroidManifest.xml. At that point, you can view it there, or copy out the contents to use with the script.
  • Alternatively you can use something like apktool if you don’t have Android Studio.

How do I view all the permissions?

If you are looking to just see if a single permission has been declared, just search through the large AndroidManifest.xml file.

How do I create a permission report?

Sometimes it is nice to know what all your permissions are in a nice clean way. There are thousands of ways you could do this, but I created a python script that creates a clean alphabetized list of all your permissions.

Example Output

android.permission.ACCESS_NETWORK_STATE
android.permission.ACCESS_WIFI_STATE
android.permission.CAMERA
android.permission.FOREGROUND_SERVICE
android.permission.INTERNET
android.permission.VIBRATE

Instructions

  • Download print_permissions_from_androidmanifest.py and place it in a directory.
  • Open your APK in Andorid Studio (by double clicking on it in your build folder)
  • Copy the contents of AndroidManifest.xml to the clipboard, and save it to a file named AndroidManifest.xml in the same directory as print_permissions_from_androidmanifest.py.
  • Run python print_permissions_from_androidmanifest.py

Conclusion

It’s nice to cleanly see what permissions you are requesting when you send your app. There are probably better ways to do something like this, and if you know of some, I’ll be happy to link them in this post!

Install Referrer Kotlin Extension

There isn’t a Kotlin Extension (KTX) library for Google Play’s InstallReferrer Library, so I wanted to share how I wrapped the API in a very Kotlin friendly way.

The Install Referrer API allows you to securely retrieve referral content from Google Play.  This can help you understand how you are acquiring new users in your app, and help you provide customized experiences tailored to where a user came from. For instance, if someone downloaded the app on a “New York” section of your website, you could open the “New York” section of the app on first app launch.

I hope this wrapper helps you!

https://gist.github.com/handstandsam/686a1bb551d0426b51dd612890f64986

Introducing “Saydle 🔊” – A Real-time Gradle Audio Notification Script for Mac OS

Saydle 🔊 is a Wrapper for the Gradle Wrapper (gradlew) that notifies you via the Mac OS say command whether a task failed or succeeded.

Why?

Knowing when a Gradle build is done is super helpful when there are long running tasks. This allows you to be notified instead of checking the terminal.

https://twitter.com/HandstandSam/status/1463207029007339520

How does it work?

  • Instead of using ./gradlew, use ./saydlew instead. That’s it!
  • Example: ./saydlew app:assembleDebug

Try It Out

Check out the install instructions on GitHub.

Saydle 🔊 on GitHub

Feedback?

Let me know what you think on Twitter at @Handstandsam, or report issues on GitHub.

Jetpack Compose – Text Shadows

This post is a journey of the steps I took while figuring out how to do a Text Shadow with Jetpack Compose. If you want to skip the journey and just get the solution, jump to the end of the post!


As of version 1.0 of Jetpack Compose, Text Shadows don’t exist in the same way they used to on TextView. 😿

Adding a Shadow on a TextView looked like this:

<TextView
    android:id="@+id/text"
    style="@style/CategoryRowTitle"
    tools:text="Category" />
<style name="CategoryRowTitle" parent="TextAppearance.AppCompat">
    <item name="android:textSize">24sp</item>
    <item name="android:textColor">@color/white</item>
    <item name="android:shadowColor">@color/black</item>
    <item name="android:shadowDx">4</item>
    <item name="android:shadowDy">4</item>
    <item name="android:shadowRadius">8</item>
</style>

Adding a Shadow to Text in Jetpack Compose

You try can put a “shadow” on your Text Composable, but it’ll create a shadow behind the text container, not the actual characters. 🤔

Text(
    text = "Fruits",
    modifier = Modifier
        .shadow(elevation = 2.dp)
)

Creating a Custom Shadow in Jetpack Compose

I did my best to create a shadow myself by making a copy of the text, setting it to a dark color, and offsetting it by 2.dp.

@Composable
fun TextWithShadow(
    text: String,
    modifier: Modifier
) {
    Text(
        text = text,
        color = Color.DarkGray,
        modifier = modifier
            .offset(
                x = 2.dp,
                y = 2.dp
            )
            .alpha(0.75f)
    )
    Text(
        text = text,
        color = Color.White,
        modifier = modifier
    )
}

Looks great! But small differences.

Let’s Cheat and Use an AndroidView in Compose 😃

Compose has amazing interoperability with the Android View system. If something isn’t perfect in Compose, we can always just use the Android View version. Pixel perfect match! However, this wouldn’t work in Compose for Desktop because it keeps us tied to the Android View system.

@Composable
fun ComposeAndroidTextView(
    text: String,
    modifier: Modifier
) {
    AndroidView(
        modifier = modifier,
        factory = { context ->
            AppCompatTextView(context).apply {
                setTextAppearance(R.style.ItemRowTitle)
                this.text = text
            }
        }
    )
}

Let’s Try Again with Compose… StackOverflow? 🤔

I did find this Stack Overflow post that was similar, but not exactly what I needed. Here is what it had:

val textPaintStroke = Paint().asFrameworkPaint().apply {
    isAntiAlias = true
    style = android.graphics.Paint.Style.STROKE
    textSize = 64f
    color = android.graphics.Color.BLACK
    strokeWidth = 12f
    strokeMiter = 10f
    strokeJoin = android.graphics.Paint.Join.ROUND
}

val textPaint = Paint().asFrameworkPaint().apply {
    isAntiAlias = true
    style = android.graphics.Paint.Style.FILL
    textSize = 64f
    color = android.graphics.Color.WHITE
}

Canvas(
    modifier = Modifier.fillMaxSize(),
    onDraw = {
        drawIntoCanvas {
            it.nativeCanvas.drawText(
                "Sample",
                0f,
                120.dp.toPx(),
                textPaintStroke
            )
            it.nativeCanvas.drawText(
                "Sample",
                0f,
                120.dp.toPx(),
                textPaint
            )
        }
    }
)

What’s the Perfect Way to Match a TextView Shadow with Compose?

I’m not really sure. Update: I figured it out thanks to Antonio Leiva!

style = MaterialTheme.typography.h4.copy(
    shadow = Shadow(
        color = shadowColor,
        offset = Offset(4f, 4f),
        blurRadius = 8f
    )
)

I wanted to share my journey in figuring this out, but also thank everyone in the community for helping find the “right” way to do it in compose!

DIY Projector Movie Theater for $545.34

This post goes into the setup I ended up with for my DIY Movie Theater. I’m not an A/V purist, so take that into consideration.

The original reason I wanted to get a projector was so I could watch a movie outside with my kids, but then it snowballed a bit. The budget projectors in the $100-$150 range didn’t have great reviews, and I wanted something a little better. This post shows what I ended up with that is now hobbled together. It works pretty great, after some trouble shooting.

Problem 1: Dolby Digital Audio

These cheaper projectors can’t process audio when it is encoded for 5.1 surround sound. When I played a kids show like “Mickey Mouse Clubhouse”, the projector played sound fine, but when I tried a movie, there was no audio at all. I went down a few rabbit holes, but finally figured out that the projector couldn’t handle Dolby Digital Audio.

I thought that bluetooth could help here, but that doesn’t work with dolby audio either, and the bluetooth audio just didn’t hold up at high volumes. It would sometimes make cracking noises.

In order to listen to something with Dolby Digital Audio, you’ll have to strip out the audio before it gets to the projector. Some people would use a stereo receiver, but I got an HDMI audio extractor and that does the trick. It’s another adapter to bring along, but allows the audio to be pulled from the HDMI signal, but then allows the HDMI signal to carry on to the projector.

Problem 2: Video Source

The projector I got doesn’t have any software on it like Chromecast or Roku, so you’ll have to bring that yourself. That works well if you’re in range of your WiFi signal, but if you go away from there, be ready to have something that hooks offline via HDMI, or USB. Another thing to note is that you may think your Phone can just be mirrored to the screen, but many video apps will show a blank screen for it.

It Finally Works! 🧟

We just finished watching The Mandalorian on Disney+ on the “Movie Theater”, and it was a MUCH better experience than watching it on our 55 inch 4k TV (That we had got on sale for $330 2.5 years ago). Having it on a big screen just really makes it something you “feel” instead of just “watch”.

The Hardware

TOTAL Price: $545.34

Final Thoughts

The projector quality at 1080p is good, but it’s not REALLY good. It’s enough for me though, and we control the amount of light in the basement, so the picture is nice. I got the soundbar later on after trying some bluetooth speakers, and that made a huge difference. Having a large, high quality projector screen is critical, but if you have weak sound, it’s just not the same.

Kotlin Multiplatform: Building a “Fat” iOS Framework for iosArm64 and iosX64

If you are building a Kotlin Multiplatform library which will be consumed by an existing iOS application, using a framework is a great way to do this. Frameworks are typically compiled for a specific target architecture which can then be run on an iPhone, iPad or iOS Simulator on your Intel Macbook.

If you are going use your Kotlin Multiplatform library as a framework in an existing app, you will want to provide a “Fat” framework which will contain both Arm64 and X64 architectures. This article contains the configuration I used to build the “Fat” framework. This is not a full build.gradle.kts file, but just the additional parts needed for a Kotlin Multiplatform project to build a “Fat” framework.

⚠️Use an XCFramework instead ⚠️

This “Fat” framework method no longer works with XCode 12+. Use an XCFramework instead.


I ended up with this Error Message in XCode 12.4: “Building for iOS Simulator, but the linked and embedded framework ‘my_library.framework’ was built for iOS + iOS Simulator.”

This Stack Overflow post shows you how to create an XCFramework from your two frameworks, and I’ll follow up with a blog post on how to do it with an XCFramework a bit later. This solutions ends up combining the two frameworks into a single XCFramework.

xcrun xcodebuild -create-xcframework \
    -framework /path/to/ios.framework \
    -framework /path/to/sim.framework \
    -output combined.xcframework

Custom Gradle Task to Build “Fat” framework

import org.jetbrains.kotlin.gradle.tasks.FatFrameworkTask

kotlin {
    // Set a name for your framework in a single place and reuse the variable
    val libName = "my_library"

    // Configure your Kotlin Multiplatform lib to generate iOS binaries
    // NOTE: This will only work on Macs
    ios {
        binaries.framework(libName)
    }

    // You can choose your output directory
    val frameworkDestinationDir = buildDir.resolve("cocoapods/framework")

    tasks {

        // Custom task to build the DEBUG framework
        // ./gradlew universalFrameworkDebug
        register("universalFrameworkDebug", FatFrameworkTask::class) {
            baseName = libName
            from(
                iosArm64().binaries.getFramework(libName, "Debug"),
                iosX64().binaries.getFramework(libName, "Debug")
            )
            destinationDir = frameworkDestinationDir
            group = libName
            description = "Create the debug framework for iOS"
            dependsOn("linkDebugFrameworkIosArm64")
            dependsOn("linkDebugFrameworkIosX64")
        }

        // Custom task to build the RELEASE framework
        // ./gradlew universalFrameworkRelease
        register("universalFrameworkRelease", FatFrameworkTask::class) {
            baseName = libName
            from(
                iosArm64().binaries.getFramework(libName, "Release"),
                iosX64().binaries.getFramework(libName, "Release")
            )
            destinationDir = frameworkDestinationDir
            group = libName
            description = "Create the release framework for iOS"
            dependsOn("linkReleaseFrameworkIosArm64")
            dependsOn("linkReleaseFrameworkIosX64")
        }
    }
}

Here are two custom gradle tasks that build a “Fat” framework for debug or release. In this I have it outputting to the build/cocoapods/framework directory, but you can configure that as you like.

Gradle Task for “Fat” iOS framework

  • Build a “Fat” debug version of the framework
    • ./gradlew universalFrameworkDebug
  • Build a “Fat” release version of the framework
    • ./gradlew universalFrameworkRelease

Importing the iOS Framework into XCode

I previously wrote a blog post about how to do this which has a companion video along with it. 👇

Thanks and Related Resources

I didn’t figure this all out myself. I just got it to work for me and extracted out the bare minimum you need to make this work. Thanks to Swapnil Patil for letting me know that “Fat” frameworks are possible. Thanks so much to Marco Gomiero for his post Introducing Kotlin Multiplatform in an existing project.

How to Install a Specific Ruby Version for Cocoapods

After a few wrong turns, the way I was able to get the correct version of Ruby to install on my Macbook was using rvm. Use the steps below. If you run into issues, you may need to install homebrew as well.

  1. Install RVM
    • curl -sSL https://get.rvm.io | bash
  2. Install the Ruby version you need (x.x.x).
    • rvm install 2.7.3
    • If you want to set that version as default, run rvm use 2.7.3 --default
    • More docs on rvm: https://rvm.io/rvm/install
  3. Install bundler
    • gem install bundler

That should be it! Now you should be able to run bundle install in your iOS project directory on the terminal, and you’re good to go from there!

Run Custom Gradle Task After “build”

After running ./gradlew build on my Kotlin Multiplatform project, I wanted to copy the JavaScript build artifacts (.js & .html) to publish a demo where someone could test my library via a web browser. A custom Gradle task is is a great way to write your own behavior to accomplish this using the Gradle build system.

My Custom Gradle Task

I found the Gradle documentation for how to copy files, and was able to write this custom task "myTaskName" to do it. You can then just run ./gradlew myTaskName and it’ll run the task independently. The problem was that I didn’t know how to get it to always run after ./gradlew build ran.

/** Copies files from "build/distributions" to "demo" directory */
tasks.register<Copy>("myTaskName") {
    println("Copying Build Artifacts!!!")
    from(layout.buildDirectory.dir("distributions"))
    include("**/*.*")
    into(layout.buildDirectory.dir("../demo"))
}

TL;DR – Use finalizedBy()

  • finalizedBy – Runs my task AFTER “build”. ✅
    • tasks.named("build") { finalizedBy("myTaskName") }
  • dependsOn – Runs “build” BEFORE my task, if my task is executed explicitly.
    • tasks.named("myTaskName") { dependsOn("build") }

To give you more details and to go into my process of how I figured it out, here are a few options I tried while figuring out how to run this custom task after every execution of the “build” Gradle task.

1. finalizedBy ✅

You can use finalizedBy() to say what task you should run after a named task. I think this reads nicely because it calls out the task dependency separately from it’s declaration. This will appropriately run after the build task executes as I needed.

tasks.named("build") { finalizedBy("myTaskName") }

2. shouldRunAfter 🤔

Another possible way to do this is with shouldRunAfter() which can just be added inside the block where you register your custom task. This will run after the build task executes. HOWEVER: I had to call .get() after registering my task to get it to work in order to have this actually run, which just feels wrong… Someone feel free to explain why, but I’m guessing this is some sort of lazy initialization happening if I don’t call “.get()”. Because of this, I don’t like this solution personally.

tasks.register<Copy>("myTaskName") {
    shouldRunAfter("build") // Tells Gradle to execute after "build" task
    // My Custom Task Code
}.get()

3. dependsOn() 🙃

You would think dependsOn() may work, but it’s the opposite behavior than what I wanted. It’s saying that “myTaskName” needs “build” to have run before it executes. It’s the opposite task dependency relationship from finalizedBy(). This wasn’t the behavior I wanted for this use case because I wanted it to copy the artifacts after every time a ./gradlew build was run, but could be useful depending on your use case.

tasks.named("myTaskName") { dependsOn("build") }

Wrap Up

None of this is rocket science, but if you try to Google for how to do it, it may take you a while to figure out how to do it. Using Option 1, finalizedBy() was the solution that worked for my use case! I hope this saved you an hour or more!

Intro to Kotlin Multiplatform JavaScript

One of the compilation targets of Kotlin Multiplatform is JavaScript. It’s pretty awesome that I can take the same Kotlin code and tools I write Android with, and write code that runs in a browser (or in Node.js).

Here is the video I’ve created to walk you through the creation of a Kotlin Multiplatform Project using the templates in Intellij IDEA, and what you can do to get your Kotlin running as JavaScript in the Browser!

Here are the code snippets mentioned in the video:

./gradlew build
 js(LEGACY) {
     browser {
         webpackTask {
             output.libraryTarget = "this" // Will add to window
         }
         binaries.executable()
     }
 }
 fun printHi() {
     println("Hello World Sam!")
 }
 fun main(args: Array) {
     printHi()
 }
 helloworldsam.printHi()